
New Construction Landscaping Guide
You've moved into a new home in Prescott or Prescott Valley, looked outside, and found tire ruts, rough fill dirt, exposed rock, and a yard that's anything but finished. That's normal for a new build, but it doesn't mean the soil, drainage, or irrigation is ready for turf and trees.
R.E. and Sons Landscaping helps homeowners, builders, and general contractors in Prescott, Prescott Valley, Chino Valley, and nearby Northern Arizona communities turn raw construction sites into usable outdoor spaces. The work may include grading, drainage, soil preparation, irrigation, planting, artificial turf, custom putting greens, paver patios, fire features, outdoor kitchens, and ongoing maintenance. The important part is completing the work in the right order, before hidden site defects become costly outdoor problems.
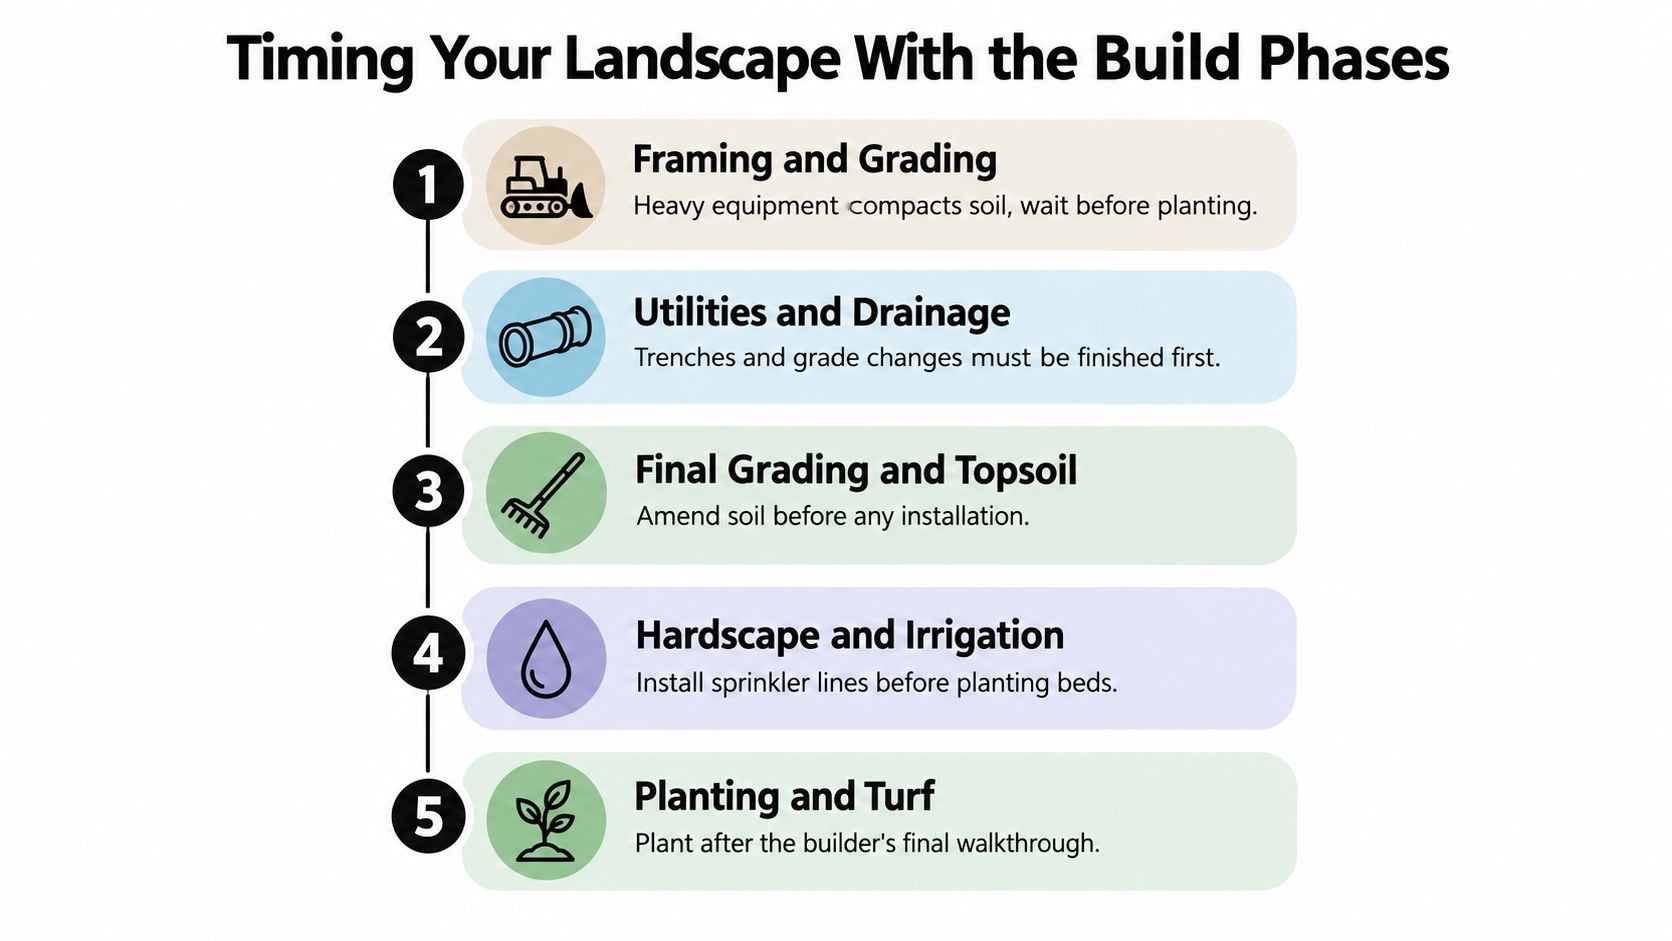
Timing Your Landscape With the Build Phases
A finished house doesn't mean a finished yard. Construction traffic often leaves soil compacted, grades unfinished, and utility trenches unsettled. If you install plants or hardscape before the builder completes final grading, later equipment movement can damage roots, crack surfaces, disturb irrigation, or force you to rebuild areas that looked complete.
The January 2025 national construction figures show why new-home landscaping remains a recurring need. Builders started 1,366,000 privately owned housing units at a seasonally adjusted annual rate, including 1,008,000 single-family starts, and completed 1,651,000 privately owned units that month, according to the U.S. Census Bureau's January 2025 construction report. Every completed detached home can require its own drainage, access, planting, irrigation, turf, and outdoor-living plan.
When should landscaping begin on a new build
Start the landscaping consultation while the home is still being framed. That gives the designer time to review the site plan, driveway, utility routes, window locations, outdoor electrical needs, patio elevations, and anticipated drainage paths. Early coordination also makes it easier to reserve space for irrigation sleeves, lighting conduits, retaining structures, and outdoor kitchens before concrete or final grade closes access.
The physical installation should usually follow a sequence like this:
Framing and rough grading: Keep landscaping materials and finished features out of equipment travel paths.
Utilities and drainage: Complete trenches, downspout connections, retaining work, and major grade changes.
Final grading and soil preparation: Remove debris, loosen compacted areas, establish drainage, and place blended soil.
Hardscape and irrigation: Install patios, walks, walls, sleeves, valves, and irrigation lines before planting beds are finished.
Planting and turf: Install vegetation after the builder's final walkthrough and after heavy equipment has left.
Protect existing trees before construction starts. Fence root protection areas, keep stored materials away from trunks, and establish designated equipment corridors. If clearing is required, a resource on arborists for land and block clearing can help explain why tree protection and site preparation belong in the early construction conversation.
Practical rule: If the builder still needs to bring heavy equipment across the yard, the landscape isn't ready for final installation.
Why final grading comes first
A patio elevation, turf area, or planting bed built on unfinished grade can become a drainage problem disguised as a design feature. Final elevations should account for foundation drainage, downspouts, slopes, walkways, driveway transitions, and the depth of the finished outdoor materials. In Prescott's dry climate, occasional intense runoff still needs a clear route away from the home.
Schedule the contractor for a site walk after the builder's grading is substantially complete, then return for verification before installation. That two-stage approach catches changes caused by utility work, driveway construction, or last-minute fill placement.
Fixing Compacted Soil and Drainage Issues
A newly finished yard can look ready for sod while water pools below the surface. Construction traffic compresses pore space, buried rubble interrupts roots, and caliche or another restrictive layer can send irrigation sideways instead of down into the root zone. Premium trees, sod, and artificial turf cannot correct those defects.
Start with a 12-inch test hole in each problem area. Fill it with water and observe the drainage. If the hole has not emptied within 30 minutes, Colorado State University Extension identifies that result as a drainage problem in its soil drainage guidance. The test does not replace professional evaluation, but it shows whether water can move through the proposed planting area.
What should happen before planting
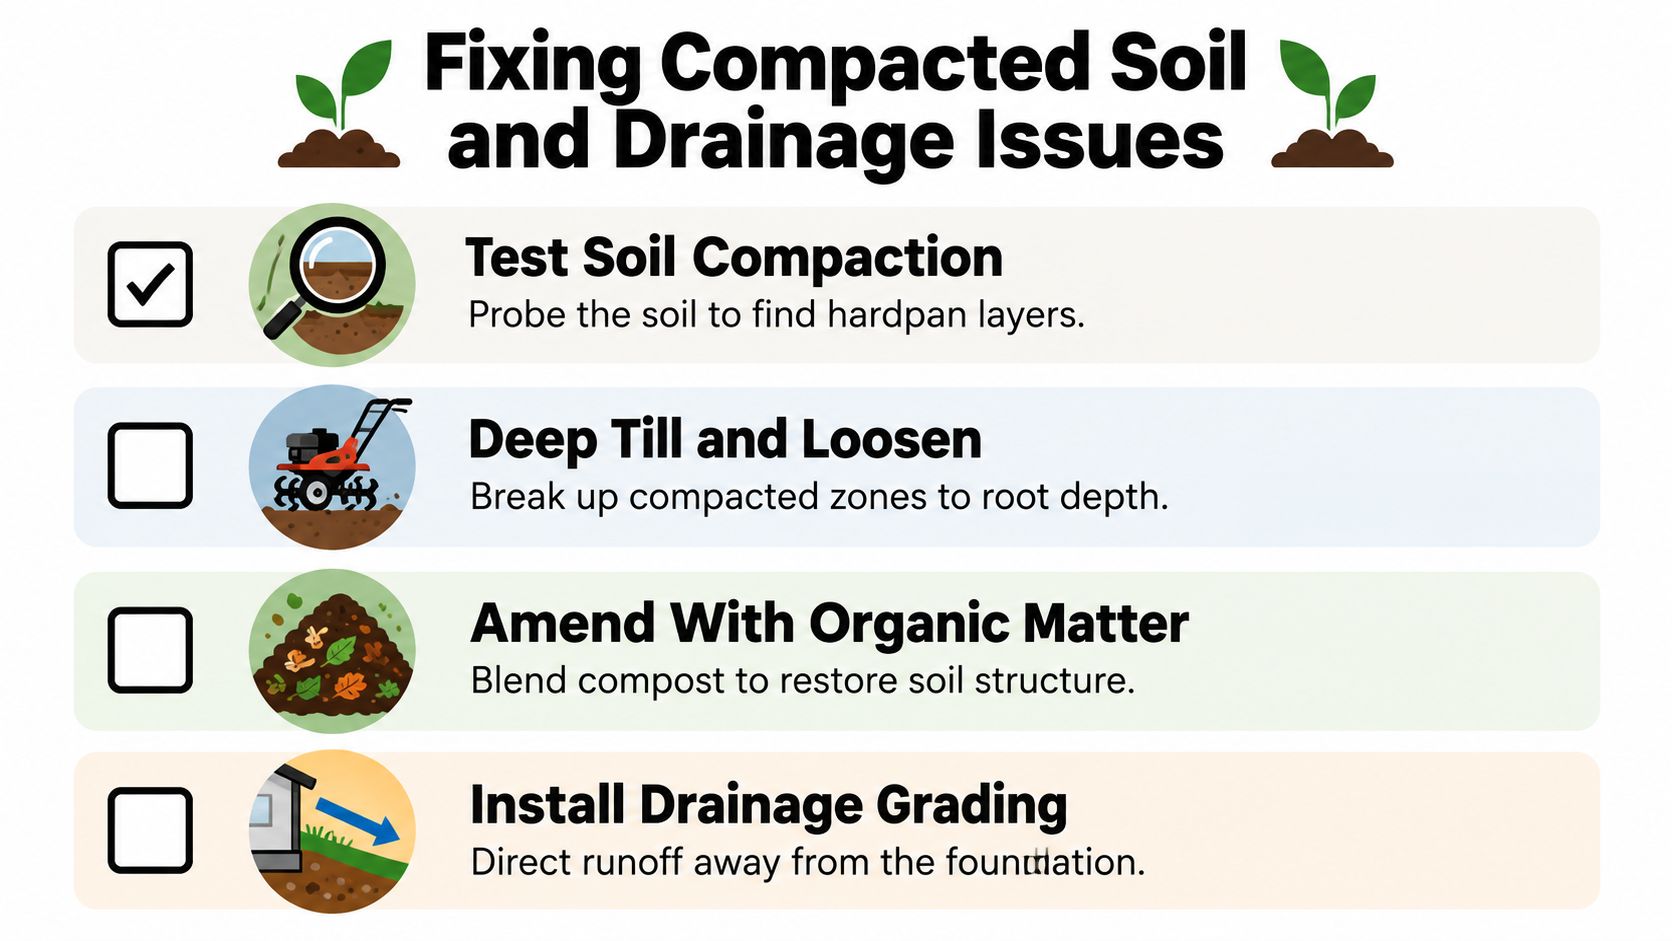
Use a soil-first sequence. Spreading imported soil over an unresolved defect only hides the problem.
Preserve what is usable: Save native topsoil where possible, protect existing trees, and remove buried rubble, concrete, glass, and construction waste.
Map the site: Mark compacted, sandy, clay-heavy, disturbed, caliche-filled, and low-lying areas. A new yard rarely has uniform soil.
Test the soil: Check texture, pH, salinity, organic matter, and nutrients before selecting amendments or plants.
Loosen the subsoil: Rip or till compacted layers before importing soil. A deep layer over hardpan creates an abrupt boundary where roots and water can stall.
Blend amendments broadly: Incorporate amendments throughout the planting area. A rich pocket in one tree hole will not repair a compacted bed.
Set final grades: Shape the surface so runoff moves away from the foundation and toward an appropriate drainage outlet.
Install the root zone: Place irrigation and plants only after soil structure and drainage are ready.
EPA guidance recommends approximately 4 to 6 inches of quality topsoil in general planting areas and at least 6 inches of well-amended soil beneath turf, as explained in the Oregon State University Extension soil preparation guide. With imported soil, blend roughly the first third with native soil to create a transition layer, then place the remainder above it. Oregon State University Extension also recommends tilling existing soil to approximately 8 inches before establishing turf.
Why imported soil alone fails
Good soil dumped over compacted fill can create perched water. Water reaches the dense layer, spreads sideways, and collects near roots or the foundation. Compost improves organic matter and structure, but it does not correct grade, drainage, or compaction.
For a detailed local service reference, see this drainage installation guide. Depending on the site, the remedy may involve ripping, double-digging, regrading, drainage collection, or another targeted measure. The restrictive layer's location and the required water outlet determine the appropriate fix. Before accepting the completed yard, have the contractor identify the test locations, confirm final grades, and show where collected water will discharge.
Balancing Water Efficiency and Fire Safety
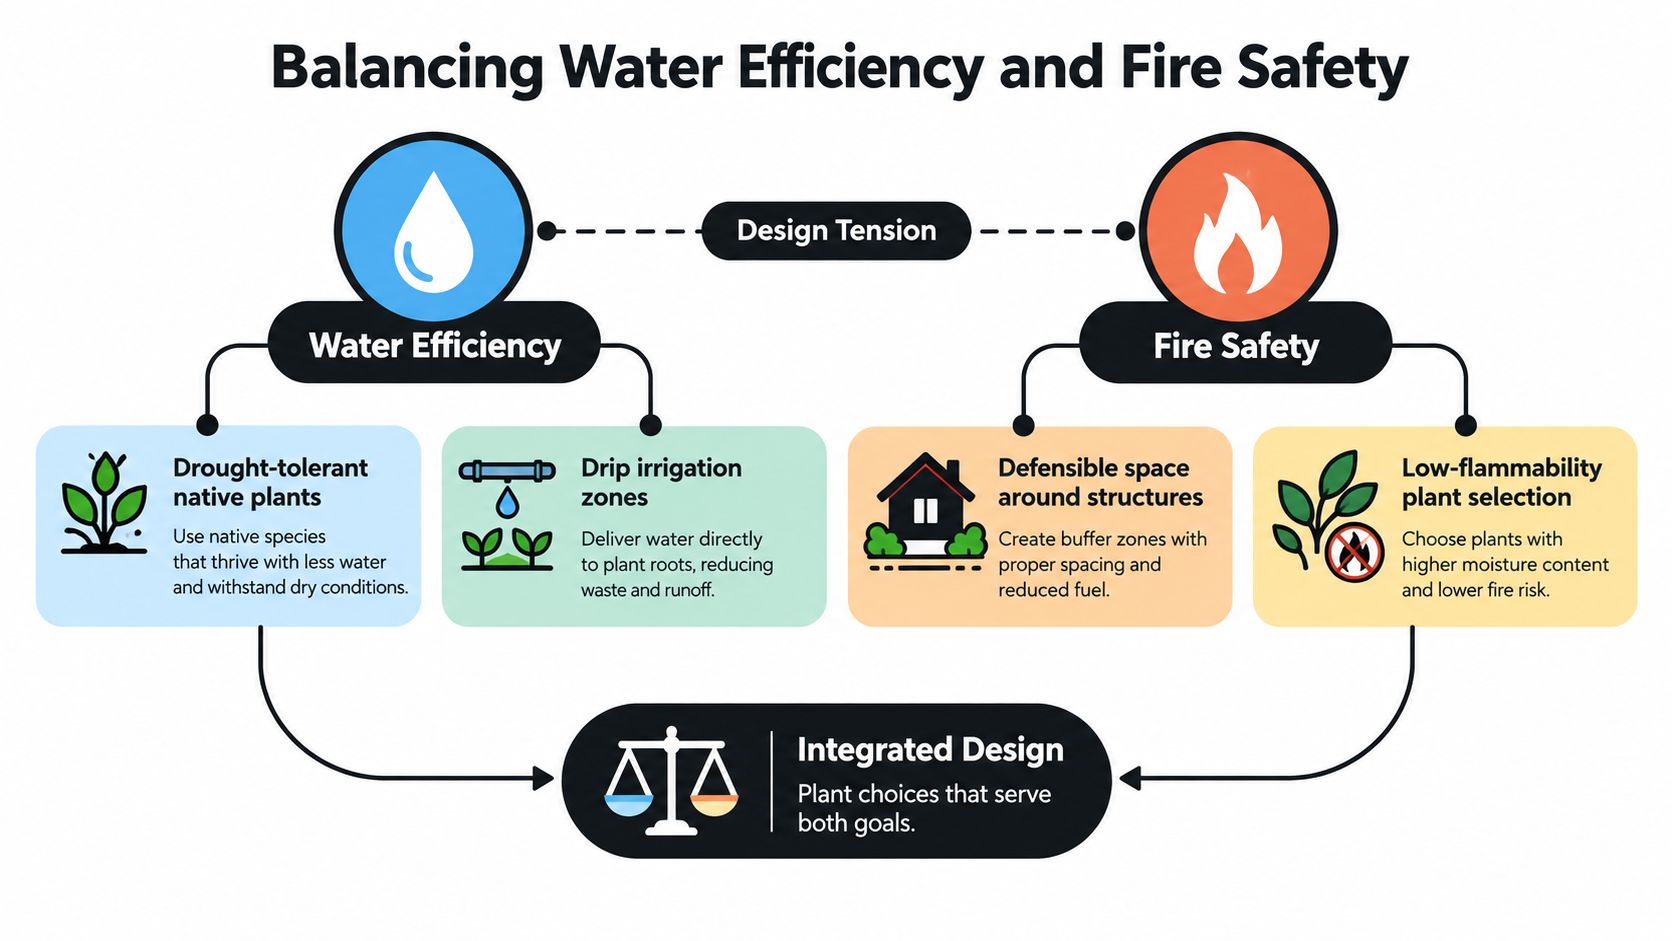
A new yard can look sparse and still carry fire through connected grasses, resinous shrubs, dead foliage, or uninterrupted evergreen planting. Low irrigation demand does not automatically make a planting defensible. In Northern Arizona, water management and wildfire preparation have to be designed together.
The University of Arizona's Yavapai County Firewise guidance explains the trade-off: plants that help slow wildfire spread may need more water. The practical answer is a set of managed zones, each with its own irrigation, spacing, maintenance, and flammability requirements.
How to organize defensible yard zones
Start near the house. Keep sightlines open, provide access for inspection, and avoid planting that creates a continuous combustible bridge. The Yavapai County guidance reflects recommendations for a 15-foot clear zone around the home, removal of perennial grasses and low dead branches, and thinning across an additional 30 feet.
The goal is deliberate separation, not a barren ring:
Closest to structures: Use irrigated, maintainable planting, pavers, concrete, gravel, or other surfaces that can be inspected and cleaned.
Between the home and outer vegetation: Separate shrubs, remove dead material, avoid dense evergreen masses, and keep branches away from walls and rooflines.
Farther from structures: Choose lower-water, adapted plants with space between groups so fire has fewer continuous paths.
At artificial turf edges: Remove leaves, needles, and dry debris, and correct drainage so the edge does not become a neglected combustible strip.
Artificial turf, custom putting greens, paver patios, fire pits, and outdoor kitchens can reduce living vegetation around gathering areas. They still require upkeep. Inspect edges for settlement, check surrounding planting, control runoff, and clear debris before it accumulates.
How much water should the yard use
Outdoor water use averages more than 30% of household water use and can reach 60% in arid regions, according to the EPA WaterSense statistics and facts. Inefficient irrigation can lose as much as 50% of outdoor water through wind, evaporation, and runoff. Improved management can reduce irrigation use by 15%, or nearly 7,600 gallons per year.
For new-home construction, the WaterSense specification limits turf to 40% of the landscapable area, or sets an evapotranspiration limit no greater than 60% of reference ET0 for cool-season grass. Reducing turf from approximately 80% to 40% can save about 25% of water. Efficient irrigation and appropriate scheduling can provide another 25% savings compared with inefficient systems, as described in the WaterSense single-family new-home specification.
Before accepting the yard, confirm that the builder has separated combustible planting, shown the irrigation coverage, and left access for ongoing inspection. A pretty installation is not finished if dry debris collects beside the house or water runs into the wrong zone.
Designing and Testing the Irrigation System
Irrigation should follow the plants, not force every plant to live on the same schedule. A sunny turf area, a shaded shrub bed, a slope, and a group of drought-adapted natives have different water demands. Connecting them to one valve guarantees overwatering in one place and stress in another.
How hydrozoning works
Create hydrozones with plants that have similar water requirements. Separate turf, trees, shrubs, low-water native plantings, and slope vegetation wherever the site plan allows. Then match sprinkler precipitation rates or emitter output within each zone so one part of the bed doesn't receive substantially more water than another.
EPA recommends hydrozoning, weather- or soil-responsive controllers, and rain shutoff capability in its WaterSense landscaping best management practice guidance. A controller should also reflect Northern Arizona conditions. Prescott's NOAA climate report lists the average last spring occurrence of 32°F as May 16 and the average first fall occurrence as October 10, with roughly 147 days between those average dates. The report also records 19.19 inches of average annual precipitation and describes May and early June as typically breezy and dry, according to the NOAA Prescott climate report.
Those are averages, not guarantees. Historical last spring frost dates in the same report range from April 11 to June 17, so frost-sensitive planting and establishment schedules need local judgment.
What to test before handover
A runtime on the controller doesn't prove that the yard is receiving uniform water. Commission each zone physically:
Pressure-test the lines: Check that pressure remains suitable when the zone operates.
Flush the system: Remove construction debris and sediment before installing or relying on final emitters.
Walk every zone: Look for broken heads, leaks, blocked emitters, ponding, dry corners, and overspray onto pavement or walls.
Check distribution: Compare wet and dry areas rather than judging performance by minutes alone.
Verify the controller: Confirm seasonal programs, rain shutoff, valve labels, and manual operation.
Reduce the schedule over time: Establishment watering should change as roots develop.
Sloped sites deserve extra attention. Complete grading or terracing before irrigation tuning, because runoff can make a properly programmed zone appear defective. For a component-by-component reference, review the sprinkler irrigation system guide.
The Builder Handoff and Warranty Checklist
Many homeowners assume the builder's warranty covers the entire yard. It usually doesn't. Warranty language may treat foundation drainage, substantial settlement, or construction-related grading defects differently from the survival of sod, shrubs, and trees. Homeowners may also become responsible for watering, controller programming, winterization, debris removal, and ongoing plant care after closing.
A 2025 builder warranty manual illustrates the distinction by excluding survival of sod, trees, and shrubs while treating substantial settlement that harms foundation drainage as a construction deficiency. It also assigns homeowners responsibility for irrigation scheduling, winterization, and water management, as shown in the CBH Homes warranty manual.
What to verify before accepting the yard
Don't wait until a tree dies or water collects beside the foundation. Complete the handoff while the builder, outdoor contractor, and homeowner can still compare conditions.
Photograph final conditions: Capture grading, drains, retaining work, planting beds, turf edges, hardscape joints, utility boxes, and visible settlement.
Confirm topsoil depth: Record where quality soil was placed and whether turf areas received the required amended root zone.
Test each irrigation zone: Photograph the controller screen, record seasonal runtimes, label valves, and document leaks or overspray.
Check foundation drainage: Verify that surface water moves away from the home and doesn't pond beside walls, steps, or entrances.
Identify coverage periods: Obtain written terms for plants, irrigation workmanship, drainage, hardscape, and settlement.
Record maintenance duties: Ask who handles watering, pruning, winterization, controller adjustments, debris removal, and repairs.
Keep approved plans: Save the grounds design, plant schedule, irrigation map, grading plan, and change orders.
A low-maintenance yard can create more documentation responsibility, not less. Artificial turf reduces mowing, and drought-tolerant plants reduce routine irrigation, but neither fixes settlement, poor drainage, compacted soil, or an incorrectly programmed system.
A warranty protects a documented condition, not an assumption. Photograph the yard, test the system, and get responsibilities in writing before closing.
Overwatering isn't a safe default during establishment. Newly planted roots need consistent moisture, but saturated soil and poor drainage can cause root failure. Turf, shrubs, slopes, and established beds require different schedules, so the maintenance plan should identify each zone rather than assigning one universal routine. General information on specialist builders warranty policies can also help homeowners understand why written coverage terms matter, although the builder's own warranty remains the controlling document.
Partnering With a Local Design-Build Landscaper
New-home yard work involves more than choosing plants. Grading controls drainage, drainage affects soil, soil affects roots, irrigation affects establishment, and hardscape elevations determine how adjacent surfaces meet. If separate subcontractors handle each task without one accountable coordinator, defects can turn into a chain of “not my scope” conversations.
A licensed, bonded, and insured design-build contractor can coordinate these interfaces from the first site review through maintenance. Homeowners still make the key decisions, but one team can organize the sequence, identify conflicts, and keep grading, soil preparation, irrigation, hardscape, and planting aligned.
What a practical process looks like
R.E. and Sons Landscaping uses a four-step process built around consultation, design approval, transformation, and enjoyment. On a raw construction site, consultation should cover soil condition, drainage, access, utilities, sun and wind exposure, frost risk, irrigation, outdoor-living goals, HOA requirements, and the builder's schedule. Ask the contractor to identify compacted areas, buried construction debris, caliche, and low spots before design approval.
During design approval, homeowners can decide how much lawn they need, where artificial turf or a custom putting green fits, and whether patios, fireplaces, fire pits, outdoor kitchens, bars, lighting, water features, rock work, or stone elements suit the property. The installation sequence should follow the approved design. A fast visual result is not a good trade if it leaves poor soil or unresolved drainage beneath the finished yard.
Ask prospective contractors:
Who owns the site sequence: Will one project manager coordinate grading, irrigation, hardscape, and planting?
Who verifies the work: Does the team test drainage, water pressure, coverage, and controller programming before handoff?
What happens after installation: Is there a dedicated maintenance department for pruning, irrigation adjustments, debris removal, and seasonal care?
What local experience matters: Can the contractor explain Prescott frost timing, dry spring winds, caliche, slopes, and wildfire defensibility?
What documentation is provided: Will you receive irrigation maps, controller settings, plant information, and written warranty terms?
For broader questions about evaluating a design professional's local presence, this local search guide for architects explains how location, service clarity, and legitimacy affect local discovery. Homeowners can also use this guide on how to choose a landscaper when comparing contractors.
R.E. and Sons Landscaping serves Prescott, Prescott Valley, Chino Valley, and nearby Northern Arizona communities. Its stated services include new-home site preparation, irrigation, artificial turf, custom putting greens, hardscape, outdoor living, and maintenance. The company is licensed under Arizona ROC #300642 and states that it provides complimentary design work and ongoing maintenance support.
If your new home has raw dirt, tire ruts, drainage concerns, or an unfinished outdoor-living plan, R.E. and Sons Landscaping can coordinate the work sequence before the yard is accepted. A site review is the right time to assign responsibilities, confirm the design, and address defects left by construction crews.
Comments