
Raised Garden Bed Construction for Prescott Yards
Taller is better. That's the line that travels furthest in raised-bed advice, and in Prescott it's usually wrong. A deep box drains fast, which sounds ideal until you're standing next to it in June with a hose in your hand. The bed that works best here is the shortest one that still drains and still roots the crop. Extra height buys you faster drying, more imported soil, and a bigger irrigation bill.
This is a construction problem before it's a gardening problem. Native soil across much of Northern Arizona is rocky, compacted, or slow to move water, and lots in Prescott Valley and Chino Valley often sit on fill or on a grade that pushes water the wrong way. R.E. and Sons designs and builds outdoor work for homeowners in Prescott, Prescott Valley, Chino Valley, and the surrounding communities, and raised beds show up in nearly every yard that wants vegetables without a fight with the ground.
What follows is the sequence that holds up: size the bed, stake the site, choose the wall, mix the fill, assemble in the right order, then keep it alive past the first season. Inches first, then the trade-offs.
Sizes Heights and Costs That Actually Work
Start with reach, because reach decides everything else. The University of Maryland Extension guide to growing vegetables in raised beds collects the working numbers from several extension programs: framed beds 6 to 12 inches high for the rooting depth of most vegetables, a 4-foot maximum width because an average adult reaches roughly 2 feet from each side, and 24 feet as a reasonable maximum length before a run should be split. On a hard surface, that same guidance pushes leafy greens, beans, and cucumbers to at least 8 inches of soil, while peppers, tomatoes, and squash want 12 to 24 inches.
The default row for a Prescott yard
A 4-foot-wide, 12-to-18-inch-tall vegetable bed answers the most common request in this climate. It drains, it roots a tomato, and it doesn't require a second mortgage in soil. Wider than 4 feet means stepping in, and stepping in compacts the soil you just paid to import.
Where native soil is bad, or where a homeowner needs to work standing rather than kneeling, the University of Arizona Cooperative Extension guidance for Yavapai County treats 18 to 24 inches as a common overall bed height. That's a legitimate row, not the default one. Every inch above 18 adds soil volume and speeds drying in dry air.
Cost scales with that choice. Using spring 2024 retail prices, the Alabama Cooperative Extension System puts a 4 ft by 4 ft by 12 in bed at roughly $60 to several hundred dollars, depending on frame materials and growing media. A taller, longer box moves toward the top of that range fast.
Raised bed size, soil depth, and cost
Bed type | Width | Frame height | Length limit | Soil depth | Cost note |
|---|---|---|---|---|---|
Vegetables, access both sides | 4 ft | 12-18 in | About 24 ft | 8-12 in if soil below is loose | 4x4x12 in about $60 to several hundred (spring 2024) |
Tomatoes, peppers, squash | 4 ft | 18-24 in | About 24 ft | 12-24 in | Largest soil volume of these rows, so the highest fill cost |
Leafy greens, beans, cucumbers on a hard surface | 4 ft | At least 8 in | About 24 ft | At least 8 in | Smallest soil volume, cheapest to fill |
One-sided bed against a wall or path | About 2 ft | 12-18 in | Shorter runs | Match the crop | Half the soil per foot of a 4 ft bed |
Paths between beds | 14-16 in walkway | Not a frame | As the layout needs | Not planted | Part of the layout, not the frame price |
Practical rule: pick one row and write it down before you buy lumber. Most overbuilt beds start with a trip to the yard and a decision about dimensions made in the aisle.
Plan the Site Sun Slope and Rules
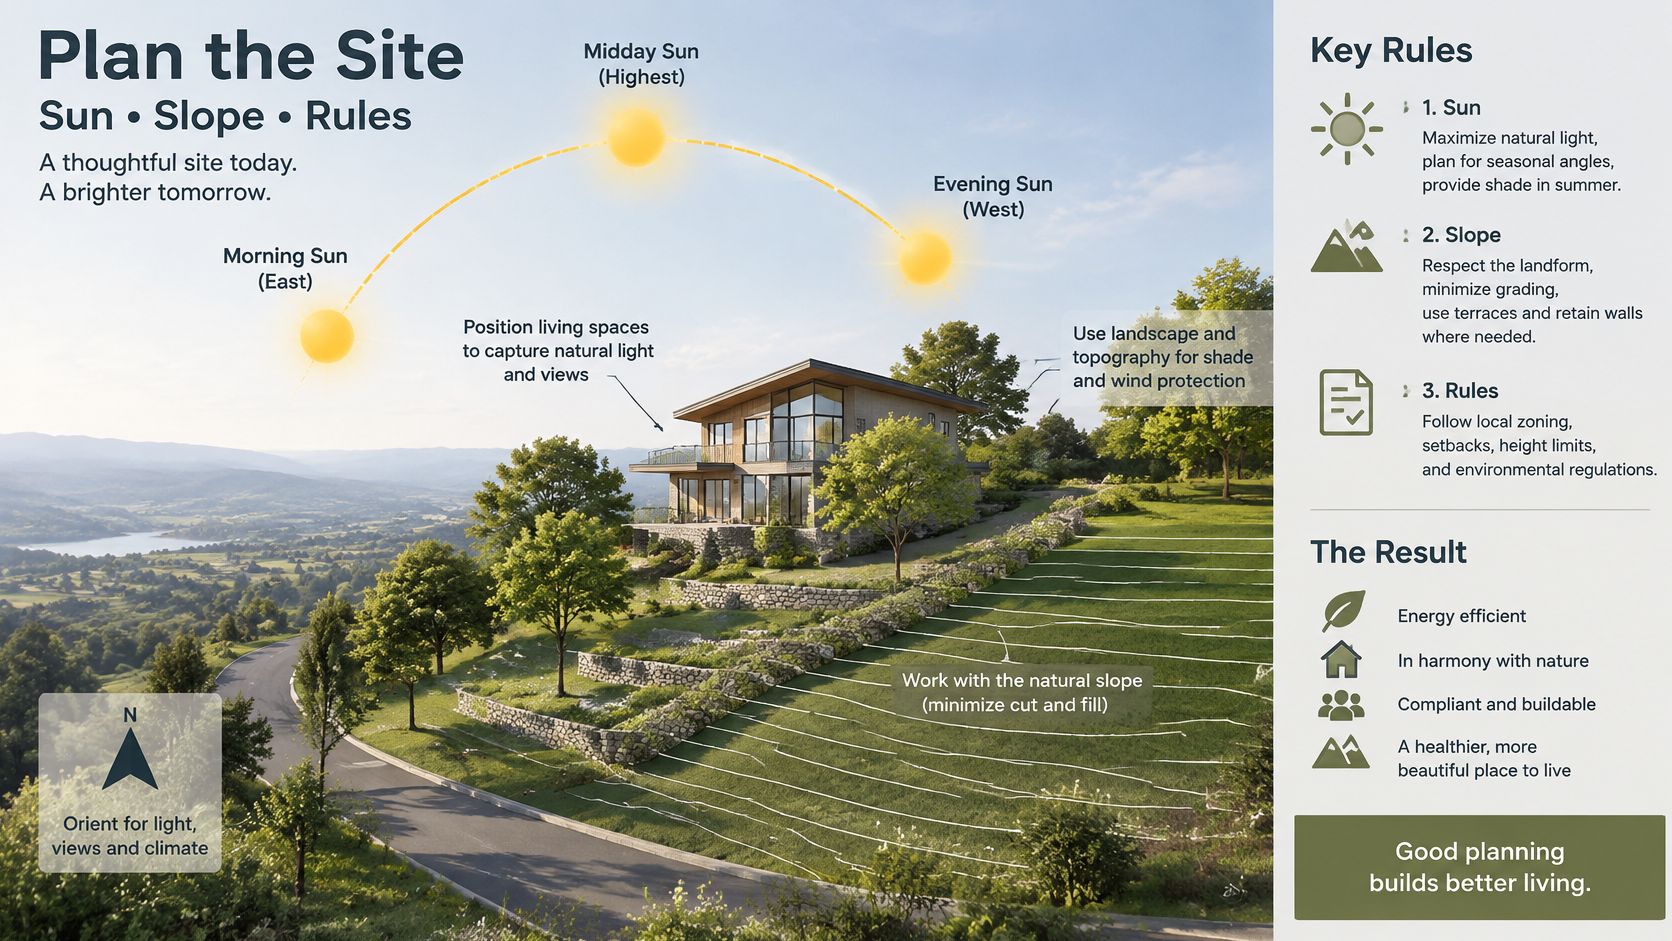
A level spot in full sun is the easy half. The harder half is confirming where water goes when it leaves that spot, and that question gets answered before anyone orders soil. On a lot that slopes toward the house, the bed's low corner becomes a small dam unless you cut it in or set the frame on grade.
Stake it out before you buy anything
Oklahoma State University Extension's raised bed fact sheet is direct about this step: measure and mark with stakes and tightly stretched twine so the finished edges are straight and the bed fits the yard. The same guidance notes that raising a bed just 6 inches above the surrounding soil can substantially improve drainage. That's the cheap version of the fix, and it's often enough.
Staking first also exposes the mistakes that cost real money. A run that looks fine on paper turns out to cross the septic line, or to leave a walkway too tight for a wheelbarrow. Fix it in twine, not in lumber.
Slope, terracing, and reflected heat
Fighting a Prescott grade with one tall box rarely ends well. A level cut into the slope, or a low retaining edge with a bed behind it, holds better and looks intentional. If water has to cross a patio or move across a slope without pooling, the grading and drainage work behind that layout is the part that decides whether the bed still drains in year three.
Site placement matters as much as grade. Beds pressed against south and west stucco pick up reflected heat all afternoon, and plants at that edge wilt first. Keep the bed a few feet off the wall and keep a hose bib, or room for a future drip line, within reach of every corner.
What needs a permit and what doesn't
A freestanding vegetable frame on flat ground is usually gardening work, not a building. That doesn't mean there are no rules. HOAs can limit structure height and placement, and the city or county can weigh in on walls, setbacks, and grading.
The line I draw is load. A wall that holds back a slope, carries a patio or driveway above it, or rises well past ordinary garden height generally needs engineering and a permit. Our design phase accounts for structural walls that support hardscape or vehicle loads, because those are no longer a box of soil.
Wood Stone Metal and Composite Frames
Cedar is the sensible default next to edibles, and it's not the only defensible answer. The Missouri Botanical Garden's guidance, published by the Chicago Botanic Garden, notes that pressure-treated wood has not been shown to affect plant growth while debate continues about produce grown close to it, and recommends untreated wood or lining treated lumber with heavy plastic when you're uncertain. That's an honest position, and it maps to a real decision framework instead of a slogan.
If you go with a liner, stop it short of the base. Heavy plastic that wraps the whole inside turns the bed into a bathtub, and the walls rot from the bottom up.
Matching the wall to the crop and the sun
Untreated cedar or another rot-resistant species is the cleanest choice where vegetables grow against the wall. Modern pressure-treated lumber is a fair compromise when cost matters, as long as you separate it from the produce you're unsure about. Railroad ties and unknown salvaged timbers don't belong beside edible crops at all, and scrap from decades-old treated stock is a different question from what's sold today.
Metal lasts and looks sharp, with one catch. The Chicago Botanic Garden guidance advises setting plants several inches away from hot metal sides, because a steel wall in direct July sun gets hot enough to stress roots at the edge. Masonry is the longest-lived option and the easiest to integrate with stone work and a sloped yard, at the highest upfront cost.
Wood that touches soil and irrigation fails first at the soil line, and Prescott's UV and freeze-thaw nights hurry that along through bare end grain and thin fasteners. Sealing cut ends and using exterior-rated screws buys years, and the same maintenance logic that applies to protecting decking and fences from rot applies to a bed wall sitting in wet soil half its life.
Frame materials for food beds
Material | Food-bed fit | Heat in Arizona sun | Service life in irrigated soil | Repair |
|---|---|---|---|---|
Untreated cedar or other rot-resistant wood | Preferred next to edibles | Moderate | Longer than pine, still finite at the soil line | Replace boards |
Modern pressure-treated lumber, lined if unsure | Growth not shown to suffer, food-contact debate remains | Moderate | Longer than untreated softwood | Replace boards, liner must not seal the base |
Railroad ties or unknown salvage | Avoid beside edible crops | Varies | Long but unsuitable here | Do not use |
Metal | Fine if crops sit several inches off the wall | High, can cook edge roots | Long | Difficult, so plan the setback first |
Stone, block, or boulder | Good, no wood-contact question | Low to moderate | Longest | Harder, needs a solid base |
Composite | Good, no rot at the soil line | Moderate | Long | Panel replacement |
The wall you pick decides what the fill and the watering schedule have to do. A thin metal bed holds less soil volume and heats faster than a masonry one, and that changes both the mix and the timer.
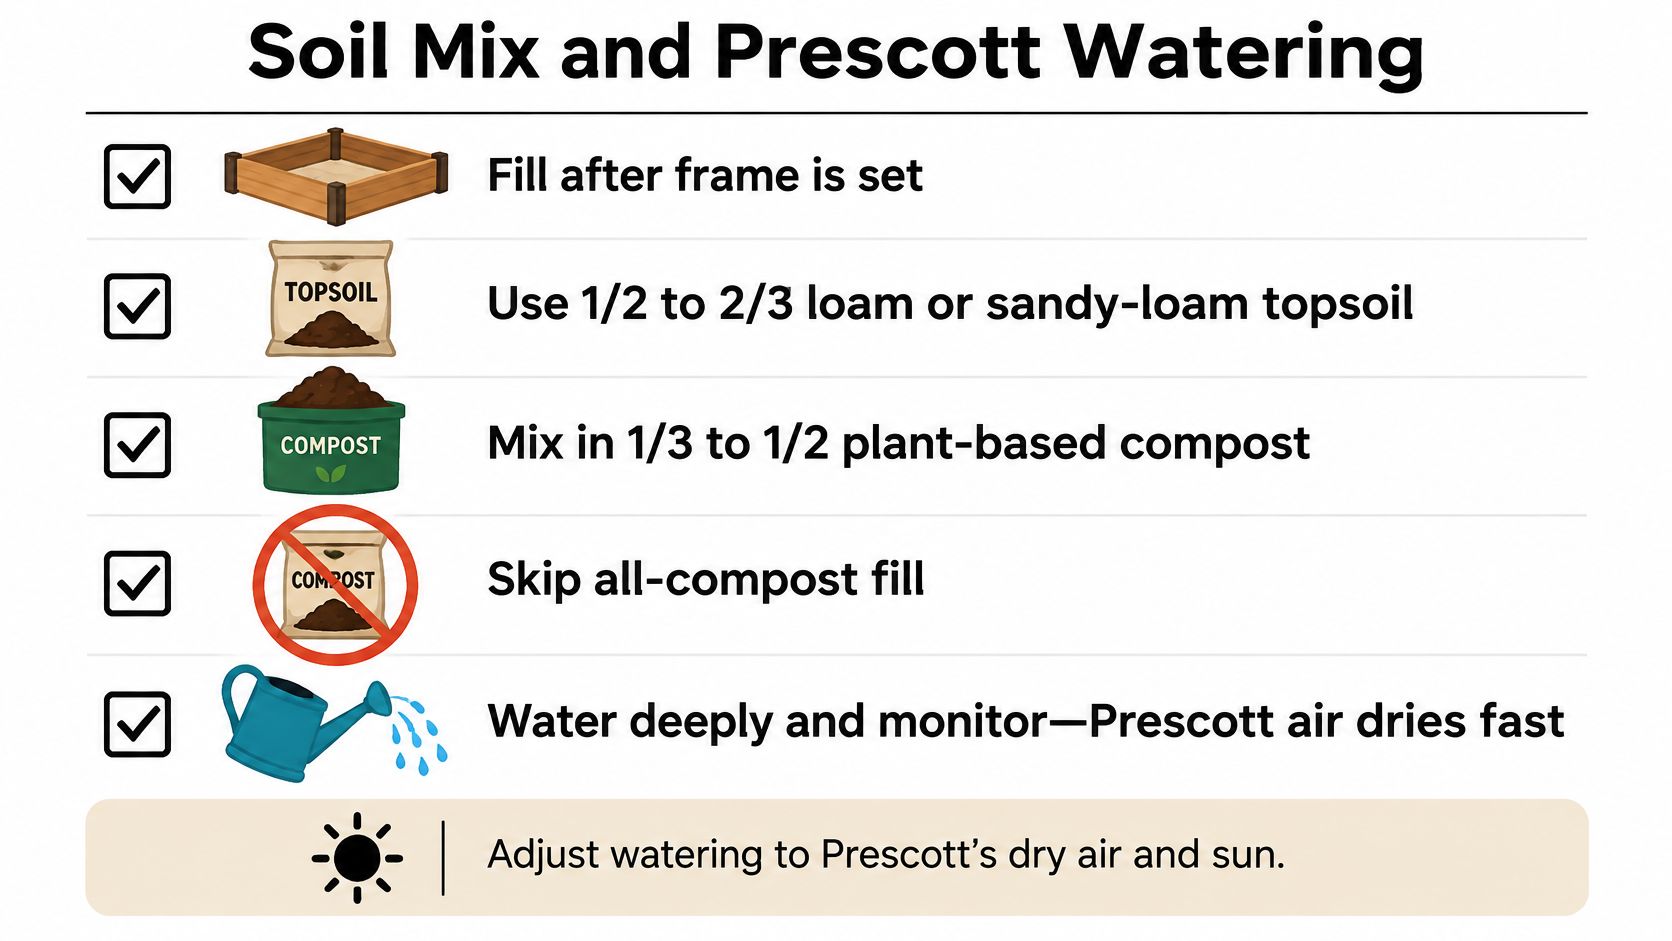
Soil Mix and Prescott Watering
Fill after the frame is set and level, never before. The University of Minnesota Extension's guide to raised bed gardens gives the ratio worth memorizing: about one-half to two-thirds loam or sandy-loam topsoil and one-third to one-half plant-based compost. Avoid highly sandy or clay-heavy topsoil, and skip the all-compost shortcut entirely.
All compost looks like the premium choice and behaves like the worst one here. Fully dry compost can become water-repellent, so irrigation runs off the surface while the root zone stays dry. A mineral soil fraction buffers that, holding moisture evenly through a June afternoon.
How much fill a bed actually takes
Do the arithmetic before you order. A 4 by 8 foot bed filled 12 inches deep holds about 32 cubic feet, roughly 1.2 cubic yards, before settling. Order a little extra, then water each layer as you add it so the mix settles instead of leaving a sunken trench by July.
The pile gets bigger with height, and that's the quiet cost of a tall bed. Going from 12 to 24 inches roughly doubles the media you buy and import.
Watering a bed in dry air
About 8 inches of that mix roots most vegetables when the ground under an open frame was loosened first, and beds planted to peppers, tomatoes, and squash are usually filled 12 to 24 inches to give those roots room. In Northern Arizona's dry climate, taller beds need more frequent irrigation because raised soil dries faster than the ground around it.
Water deeply, then let the top inch dry before the next cycle. A shallow daily pass trains roots upward into the fastest-drying layer of the bed.
Run drip or soaker line on a timer so water reaches roots instead of blowing sideways in afternoon wind. Mulch the surface, keep the box off the south and west stucco that throws heat back, and put vegetables on their own irrigation zone so ornamentals aren't soaked on a vegetable schedule.
Two more rules hold up. Test imported soil for contaminants before it goes in, and sample the bed itself rather than the path beside it, since the two can read very differently. Then treat the local ground as a known quantity by understanding Prescott's soil types before you decide whether to open the bottom of the frame.
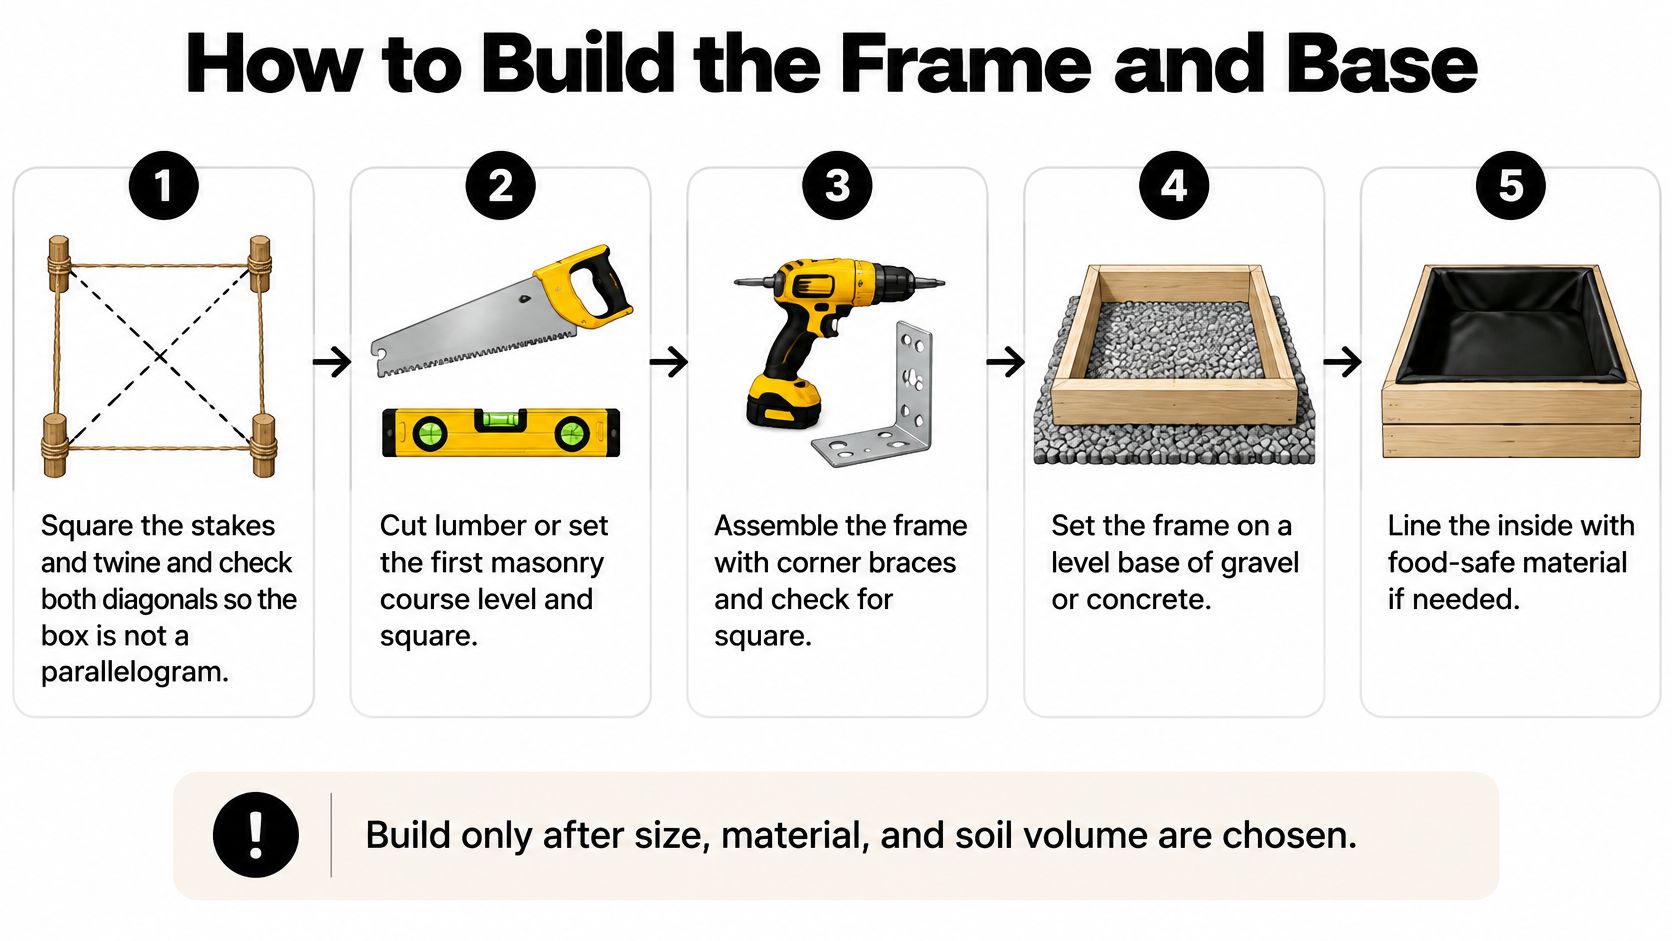
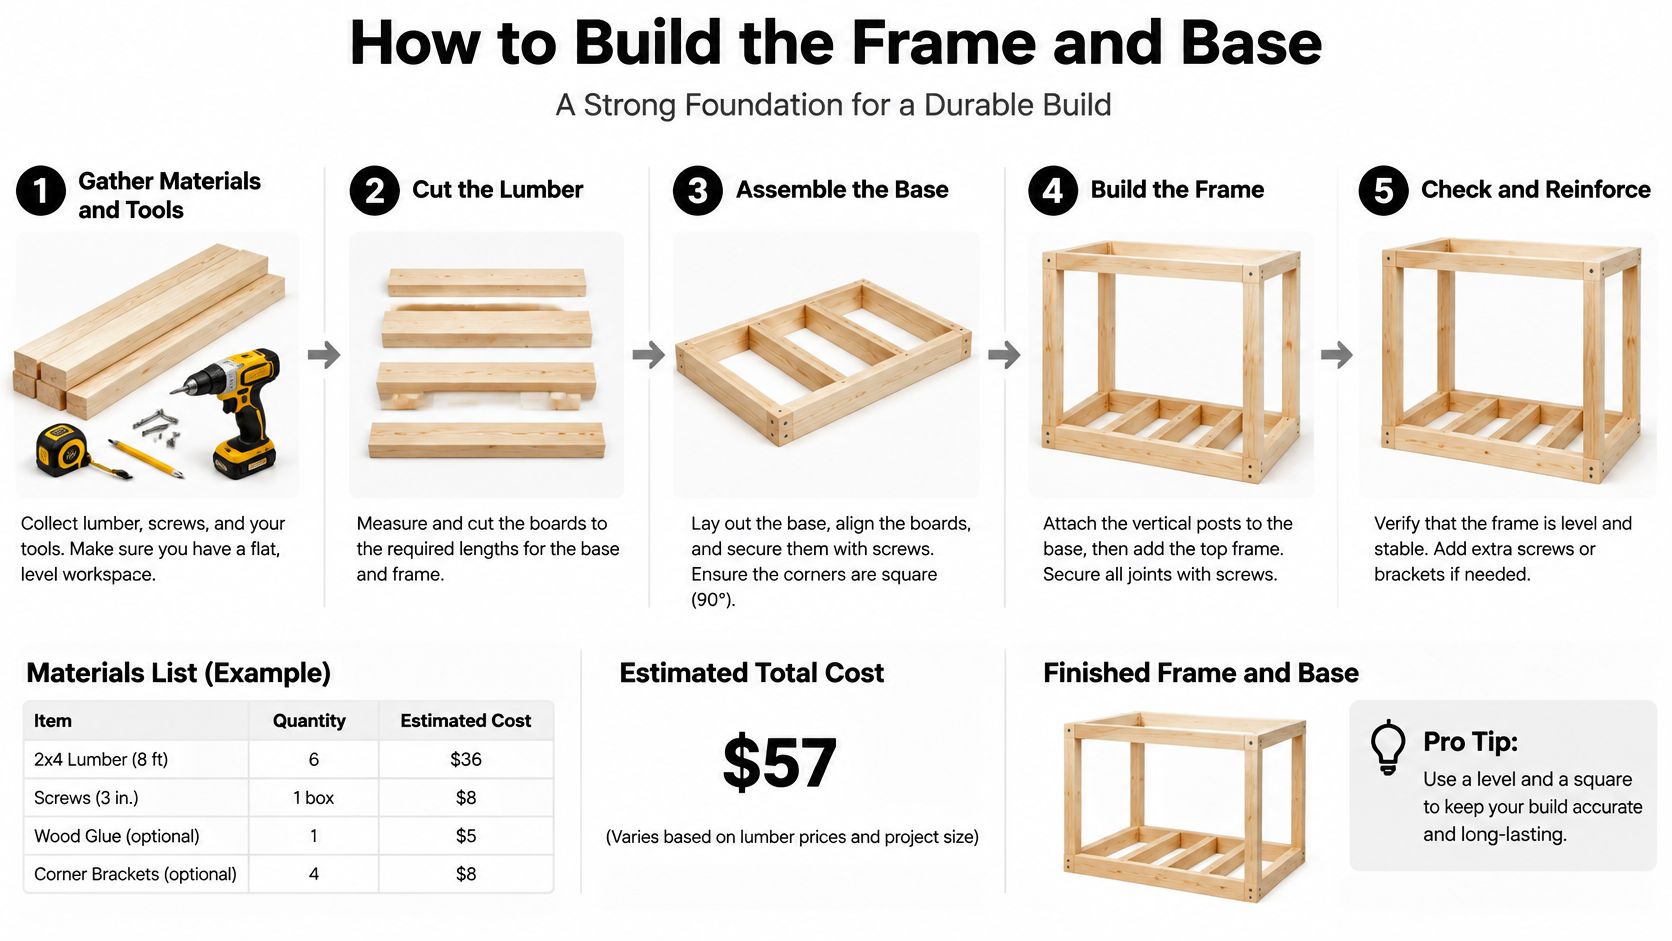
How to Build the Frame and Base
Raised beds aren't a recent trend. Utah State University Extension's raised bed gardening guide points out that crops have been grown for centuries in modified, raised soil areas separated by walkways. The numbers that guide construction are just as old-fashioned, including a 48-inch overall bed width with a 14 to 16 inch walkway, which leaves about 36 inches of flat planting surface once the soil is shaped.
Build only after size, material, and soil volume are settled. Then work in this order.
Square the stakes and twine. Check both diagonals. Equal diagonals mean a rectangle; unequal means a parallelogram that will fight every board after it.
Cut to the height you already chose, usually 12 to 18 inches for vegetables. If you're setting masonry, set the first course level and square before anything else goes on top.
Fasten corners with exterior screws or brackets. On any side longer than about 8 feet, add a mid-span stake or interior cleat so the weight of wet soil doesn't bow the board outward by August.
Set, level, and cut into grade. Shim a bed on flat ground. On a Prescott slope, excavate the high side instead of stacking a level box on a tilted surface.
Leave the bottom open under 12 inches. Roots need to reach the soil below, and the ground beneath should be loosened first.
Give a hard-surface bed a drained base. A frame on concrete or a patio needs somewhere for water to leave, not a sealed tub.
Fill in layers, water to settle, top off, then plant. Wet soil settles; dry soil surprises you.
Stop point: if the wall will carry a patio, a vehicle, or a steep cut, it's past a DIY box and into engineered work.
A simple 4 by 8 wood bed is a weekend for two people with a drill, a level, and a couple of yards of soil. A stone bed, a run near 24 feet, or a terrace takes longer and usually needs equipment for moving material.
Problems After the First Season
Most raised-bed failures show up in the second summer, and most of them are fixable in an afternoon. Each spring, add 1 to 2 inches of compost, renew the mulch, and check corner screws and any side that has started to bow. Don't empty a sound bed every year. The soil is the asset.
Afternoon wilt in July, hours after a morning watering, is the signature complaint here. It usually means the bed is too tall, unmulched, or parked against reflected heat, not that it needs more soil. Add mulch, lengthen the drip cycle, and move plants off a hot metal wall before you consider rebuilding anything.
A soggy corner with yellowing lower leaves is an outlet problem. Clear the low side so water has a path, and don't answer it with more compost. Compost on top of a drainage problem makes the problem wetter. A white crust on the surface is salt from irrigation water, which calls for an occasional deep leach and a lighter hand with fertilizer.
Weeds concentrated in the middle and a rock-hard center mean someone stepped in. Stay on the walks. Soft, crumbly wood at the soil line means that board is finished, not the garden; replace the course and keep the rest.
Rebuild only when walls bow, wood rots through, or the bed was built as a sealed tub in the first place. Everything else is maintenance.
Finish It Yourself or Hire in Prescott
Build one 4 by 8 bed yourself when the ground is flat, you can square a corner and level a frame, and you're willing to move about a yard of soil by wheelbarrow. That's a reasonable Saturday for two people. The calculation changes when the lot slopes, when the bed doubles as a seat wall or terrace, or when the garden has to tie into stone, turf, or an outdoor living area.
When a low bed is still not a DIY job
When it holds back a slope, supports a patio or driveway, or needs an engineered wall and a permit. A freestanding vegetable frame on flat ground usually counts as garden work rather than a building, but HOAs and the city or county can still set rules on height, placement, and grading.
How long does a simple wood bed take
Plan a weekend for two people on flat ground, and more once masonry, a long run, or a terrace is involved. Add a day if imported soil has to be moved any distance from where the truck can park.
What to have ready before you call
Have the width, height, material row, and a stake-and-twine layout already marked. A site visit can then price your actual yard instead of a generic box, and the conversation moves straight into the design step of our four-step process: consultation, design, transformation, and enjoy.
R.E. and Sons Landscaping is a licensed contractor, ROC #300642, serving Prescott, Prescott Valley, Chino Valley, and nearby Northern Arizona communities. Office hours are Monday through Friday, 8am to 4pm, and consultations are scheduled online or by phone. If you're comparing bids rather than materials, verify the contractor's license before anyone breaks ground.
R.E. and Sons Landscaping builds raised garden beds as part of full yard transformations, from the first stake in the ground through final planting and hardscaping, so the bed sits correctly against your grade, irrigation, and outdoor living space instead of standing alone in the yard. If you're planning vegetables in Prescott, Prescott Valley, or Chino Valley, bring us your dimensions and we'll design a bed sized for your soil, your slope, and your water. Visit R.E. and Sons Landscaping to schedule a consultation and start with a design that fits your yard.
Comments