
Paver Patio Slope: Ideal Grades and How to Set Them
A paver patio should fall 1/8 to 1/4 inch per foot, about 1 to 2 percent, away from the house so rain moves off the surface instead of pooling or running toward the foundation. R.E. and Sons Landscaping helps homeowners in Prescott, Prescott Valley, Chino Valley and nearby Northern Arizona communities set that fall correctly before the first paver is placed, so the finished patio drains well without feeling tilted underfoot.
That small range matters more than it sounds. Too little fall and water sits in low spots, stains joints and softens the base. Too much fall and chairs wobble, tables look off level and walking across the patio feels uncomfortable. The right paver patio slope is a balance between drainage, comfort and access, and it starts with reading your soil, your door height and where the water will go once it leaves the edge.
Ideal Paver Patio Slope at a Glance
Between 1 and 2 percent. That narrow band, equal to 1/8 to 1/4 inch of fall per foot, is where a paver patio drains well without feeling tilted. R.E. and Sons Landscaping uses this range as the starting point on paver patio projects across the Prescott area, then adjusts the layout to each yard's grade during design.
The lower end of the band is usually the most comfortable underfoot. It keeps water moving on a well-built base. Climb toward the upper end only when the ground drains slowly or runoff has farther to travel before it clears the patio edge. The goal is steady movement, not speed.
What Do These Slope Numbers Mean Over 10 Feet
Percentages are hard to picture. Total fall over a fixed distance is easier. This table converts each target into the drop you would measure across 10 feet of patio.
Paver patio slope targets and fall over 10 feet
Target | Slope | Percent | Fall over 10 feet |
|---|---|---|---|
Standard drainage minimum | 1/8 inch per foot | 1.04% | 1.25 inches |
Middle of the range | 3/16 inch per foot | 1.56% | about 1.9 inches |
Upper drainage limit | 1/4 inch per foot | 2.08% | 2.5 inches |
A homeowner in Prescott Valley with a tape measure and a 4-foot level can check any of these numbers on an existing slab or a string line before digging starts.
What Does That Look Like on a 12-Foot Patio
Scale the same math to a typical 12-foot patio and the differences get easier to feel. At 1/8 inch per foot, the surface drops about 1.5 inches from the house edge to the far edge. At 1/4 inch per foot it drops about 3 inches. The middle of the range lands near 2.25 inches.
All three drain. The difference shows up once the patio is furnished: whether chairs sit flat, a tray stays level as you carry it, and a stroller rolls straight instead of pulling downhill.
Practical rule: Choose the lowest slope that drains reliably, because each extra fraction of an inch makes chairs, tables and walking less comfortable.
That rule matters most when someone in the household uses a wheelchair, a walker or unsteady footing. Keep the walking surface near the gentle end and solve any remaining drainage problem at the edge, where a drain or shallow swale can carry water away without tilting the space people use.
Does ADA Slope Apply and How Soil Sets Your Target
Most private backyard patios aren't bound by ADA slope rules, but the federal standards give you the clearest benchmark for comfort and drainage. They matter whenever a patio connects to an accessible entrance, a door, an outdoor kitchen or a daily route through the yard.
Under the U.S. Access Board's ADA guidance, an ordinary walking surface should have a running slope no steeper than 1:20, equivalent to 5%, and cross slope limited to 1:48, approximately 2.08%. If a route exceeds 5%, it's generally treated as a ramp and must meet ramp requirements, including a maximum running slope of 1:12, or 8.33%, where permitted. For a 10-foot-wide patio, that cross slope is roughly 2.5 inches of total fall, while a 5% running slope is 6 inches of fall over 10 feet.
Why Can't You Just Make It Steeper to Drain Faster
You can't steepen the walking surface to chase drainage without affecting the people using it. A stronger sideways tilt makes wheelchairs drift, walkers feel unstable and anyone with limited balance work harder on every step. Send excess water to an edge drain, swale or approved outlet instead. Our guide to grading and drainage planning explains how we pair surface fall with an outlet so water has somewhere legal and useful to go.
That thinking is especially important in Prescott and Prescott Valley, where many lots aren't flat to begin with. A patio may need to hold a gentle fall away from the house while the yard drops, rises or tilts sideways beyond the edge. We check grade in both directions first, running slope and cross slope, before we set finished elevations.
How Does Soil Change the Target Slope
Soil then sets the target within the comfort limits. Sandy soil drains quickly, so the gentler end of the range usually works. Loam holds some moisture, so you often need a little more fall. Clay drains slowly and swells and shrinks with moisture, so it needs a deeper compacted base, a geotextile separator, a target near the upper end and a clear outlet. On top of the base, plan for about 1 inch of screeded bedding sand before pavers go down.
Soil type, drainage and base depth for paver patios
Soil type | How water moves | Base depth and slope target |
|---|---|---|
Sandy soil | Drains quickly, low ponding risk | 4 inches compacted base; 1/8 inch per foot is usually enough |
Loam | Moderate drainage, holds some moisture | 4 to 6 inches compacted base; 1/8 to 1/4 inch per foot |
Clay | Slow drainage, swells when wet and shrinks when dry | 6 inches or more with geotextile; aim for 1/4 inch per foot plus a clear outlet |
Fill or disturbed ground | Settles unevenly | Test compaction before setting grade; base depth confirmed after testing |
Prescott's freeze-thaw winters make a well-compacted base essential, because water left in a weak base expands, contracts and opens low spots over time. Dig a test hole and record the soil type before you set any grade. That one observation tells you whether you're building on ground that helps drainage or ground that fights it.
How to Read Slope Ratios and Calculate Fall
A 14-foot patio that drops 1.75 inches sheds water reliably, and most homeowners never feel the tilt underfoot. That is the payoff of reading slope ratios correctly: small fractions on paper become a grade you cannot see but water can.
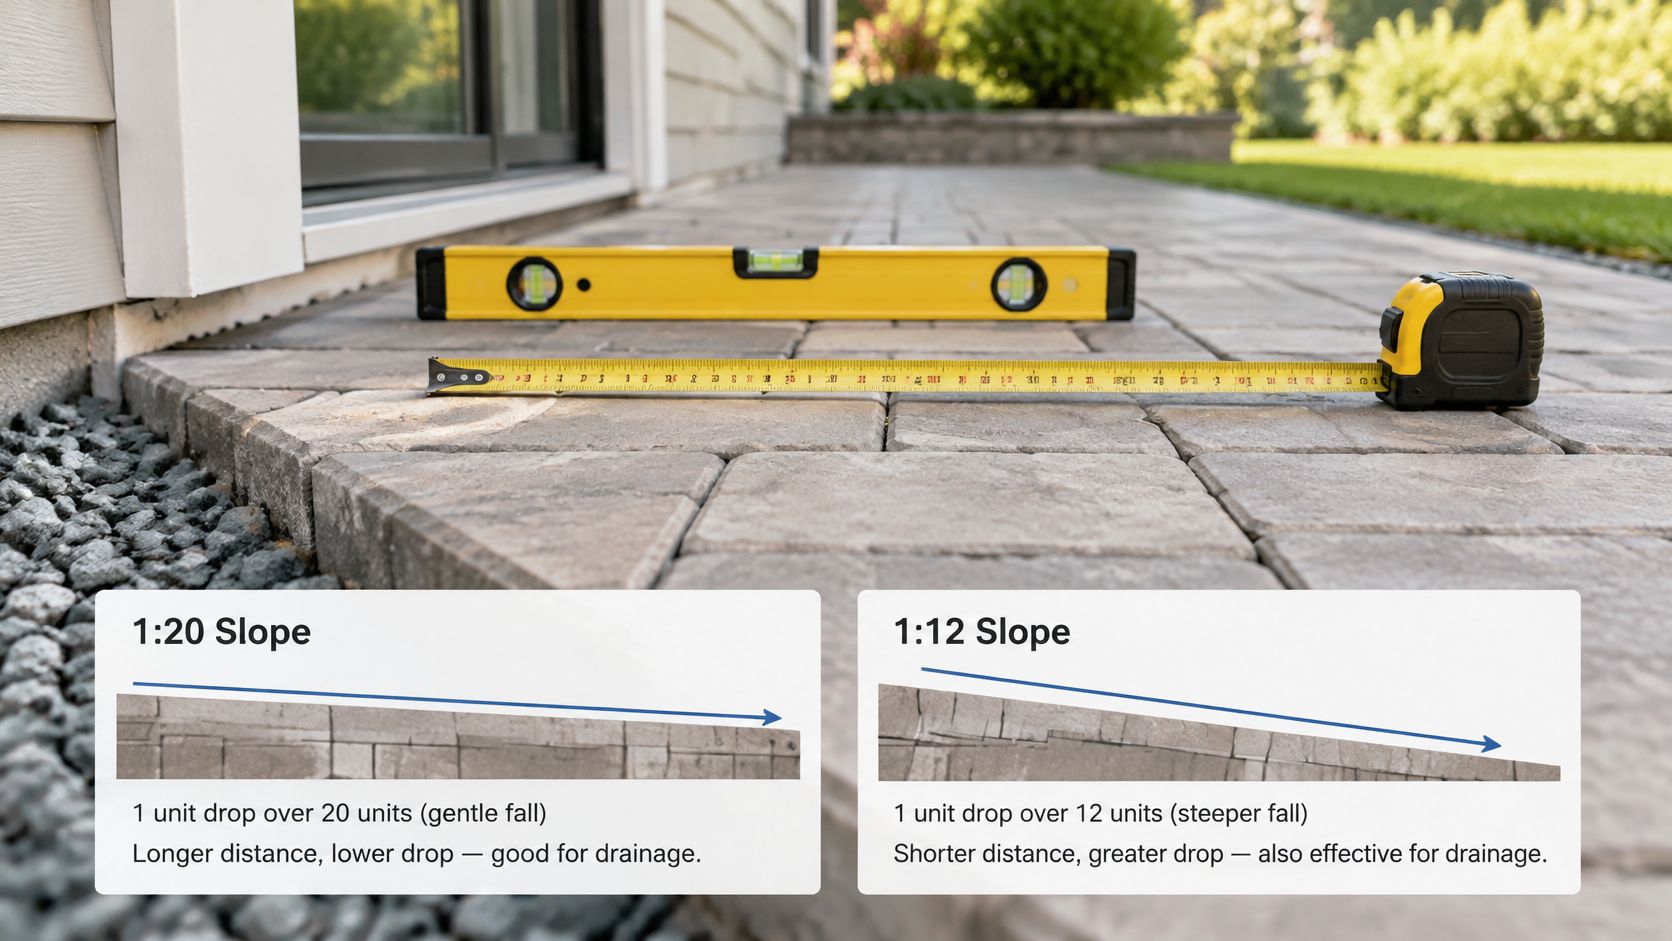
Every ratio reads the same way, as rise over run, meaning vertical change divided by horizontal distance. The U.S. Access Board guide to ramps and curb ramps states slope as rise to run, so 1:12 rises 1 inch for every 12 inches of run and 1:20 rises 1 inch for every 20 inches, equal to 8.33 percent and 5 percent. A steeper ratio covers the same rise in less space, which is why a 12-inch drop needs 20 feet of run at 1:20 but only about 12 feet at the 1:12 ramp limit. On sloped Prescott and Chino Valley lots, that math decides whether a grade change becomes a gentle patio transition, steps, a ramp or retaining work.
Think of the ratio as a staircase described sideways: it tells you how much the surface climbs compared with how far it travels. The gentlest ratios spread that climb so thin that the surface reads as flat.
This photo shows the basic tools you'd use to check those ratios on site before you commit to a layout.
How Do You Calculate Total Fall in Inches
The formula in plain words: total fall in inches equals run in feet multiplied by slope in inches per foot. A 14-foot patio at 1/8 inch per foot gives 14 times 0.125, or 1.75 inches of fall. The same patio at 1/4 inch per foot drops 3.5 inches, a difference you can start to feel when you walk it.
Measure the run: Go from the house wall to the outer edge in feet.
Pick the target: Choose your inches per foot based on the soil drainage and comfort limits already set for the space.
Multiply: Run times target gives total fall.
Round: Round to the nearest eighth of an inch for field marking.
Mark the far edge: Use the house-side height as your reference and mark the lower height on a stake.
Step 2 is where the two goals meet on the same number line. Your soil tells you the minimum fall water needs to leave the surface, and any door connection tells you the maximum a comfortable route allows, so the target has to satisfy both at once.
This short walkthrough shows how a level reading turns into a marked drop on stakes.
For a quick percent check, divide inches per foot by 12 and multiply by 100. That is how 1/8 inch per foot becomes about 1.04 percent. It is a handy way to verify a proposal when one contractor quotes inches and another quotes percent, because both are describing the same tilt in different units.
Check Your Slope Before You Pave
Work through this list before any digging starts, because your target slope depends on each answer. These checks cost little compared with lifting pavers to fix a tilt later.
Measure fall in both directions: Use a 4-foot level, mark the high point at the house wall and the low point at the far edge, then check sideways tilt too.
Confirm the exit: Decide whether water leaves through an edge drain, a swale or another approved outlet, and walk that path to the street or yard low point.
Dig a test hole: Record whether you find sand, loam, clay or fill, because each one sets a different base depth and fall target.
Check door connections: Decide whether the patio connects to a door or accessible route, which brings the 1:20 and 1:48 limits into the plan.
Check retaining needs: Confirm whether any retaining wall needs engineering and permits before you dig.
Our retaining wall process starts with a consultation in which we assess the slope, drainage, soil conditions and what you want the space to do. That same order works for a patio, even when no wall is planned.
Once the answers are recorded, you have the high point, the outlet, the soil target and the accessibility limit needed to set the grade with confidence.
Don't skip the outlet question because the patio looks like it falls the right way. Water that reaches the edge with nowhere to go will back up, soften the border and find the lowest joint to sit in.
How to Set the Slope During Installation
Setting slope is a sequence, not a last-minute adjustment with extra sand under one corner. In our Design step, we develop a layout that fits the yard's grade, uses natural stone placement and integrates with existing hardscape, so elevations are decided before excavation begins. Our step-by-step paver patio installation guide shows how that layout carries through the build.
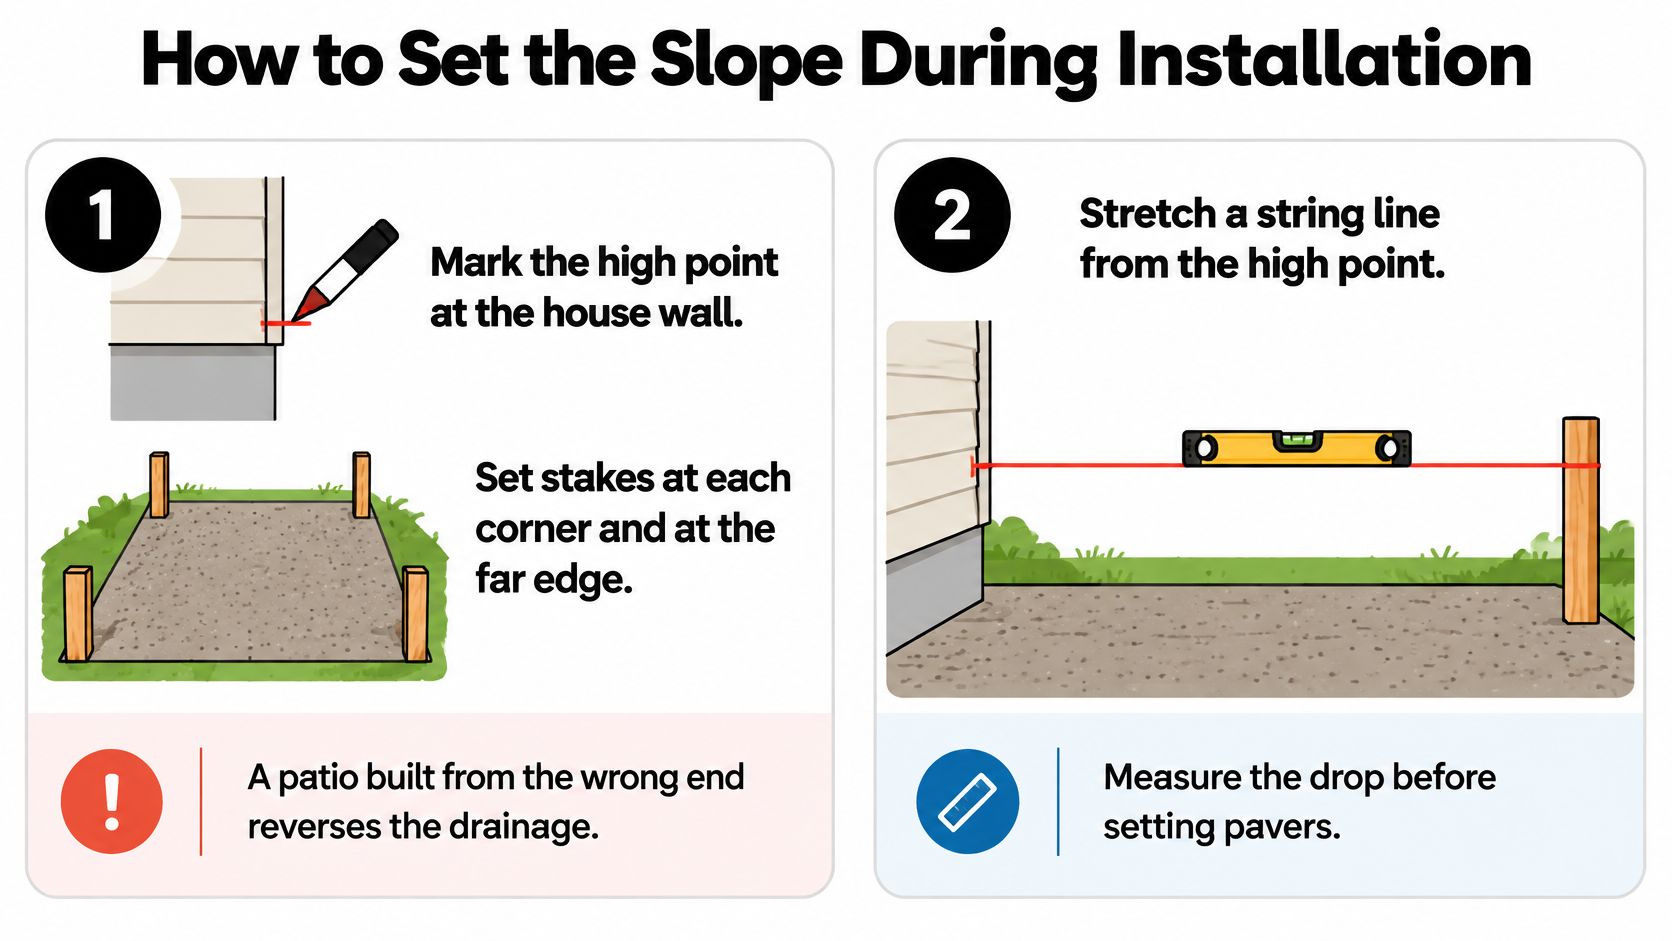
This infographic covers the first marking steps that lock in direction before you remove soil.
What Are the Steps to Build the Fall Into the Base
Mark the high point at the house wall. Set stakes at each corner and at the far edge. A patio built from the wrong end reverses the drainage, and no surface fix corrects that cleanly.
Stretch a string line at the calculated fall. Run it from the high stake to the low stake and keep it taut. The string is the reference every later step follows.
Excavate with slope in the subgrade. Dig to base depth with the fall already shaped into the ground, not added at the surface. Surface fill settles and creates low spots you'll see after the first hard rain.
Compact and build base in lifts. Compact the subgrade, then add aggregate base in thin lifts and screed it to the string. Thin, uncompacted layers are the most common source of later tilt.
Check every 4 feet. Use a 4-foot level and a digital level as you go, and correct flat or dipping spots before bedding goes down.
Screed bedding and set pavers. Spread about 1 inch of bedding sand, screed it to the same string line, then set pavers without disturbing the bed.
Compact and sweep joints. Compact the pavers so they seat evenly, then sweep in joint sand. Compacting locks the grade in place and reveals any rocking units while they're easy to fix.
A well-set patio sheds water evenly and reads level to the eye. You shouldn't see the slope. You should only notice that puddles don't form and furniture sits steady.
If you have to think about the tilt while you're sitting on the patio, the slope is doing its job at the expense of the people using it.
Common Slope Problems and How to Fix Them
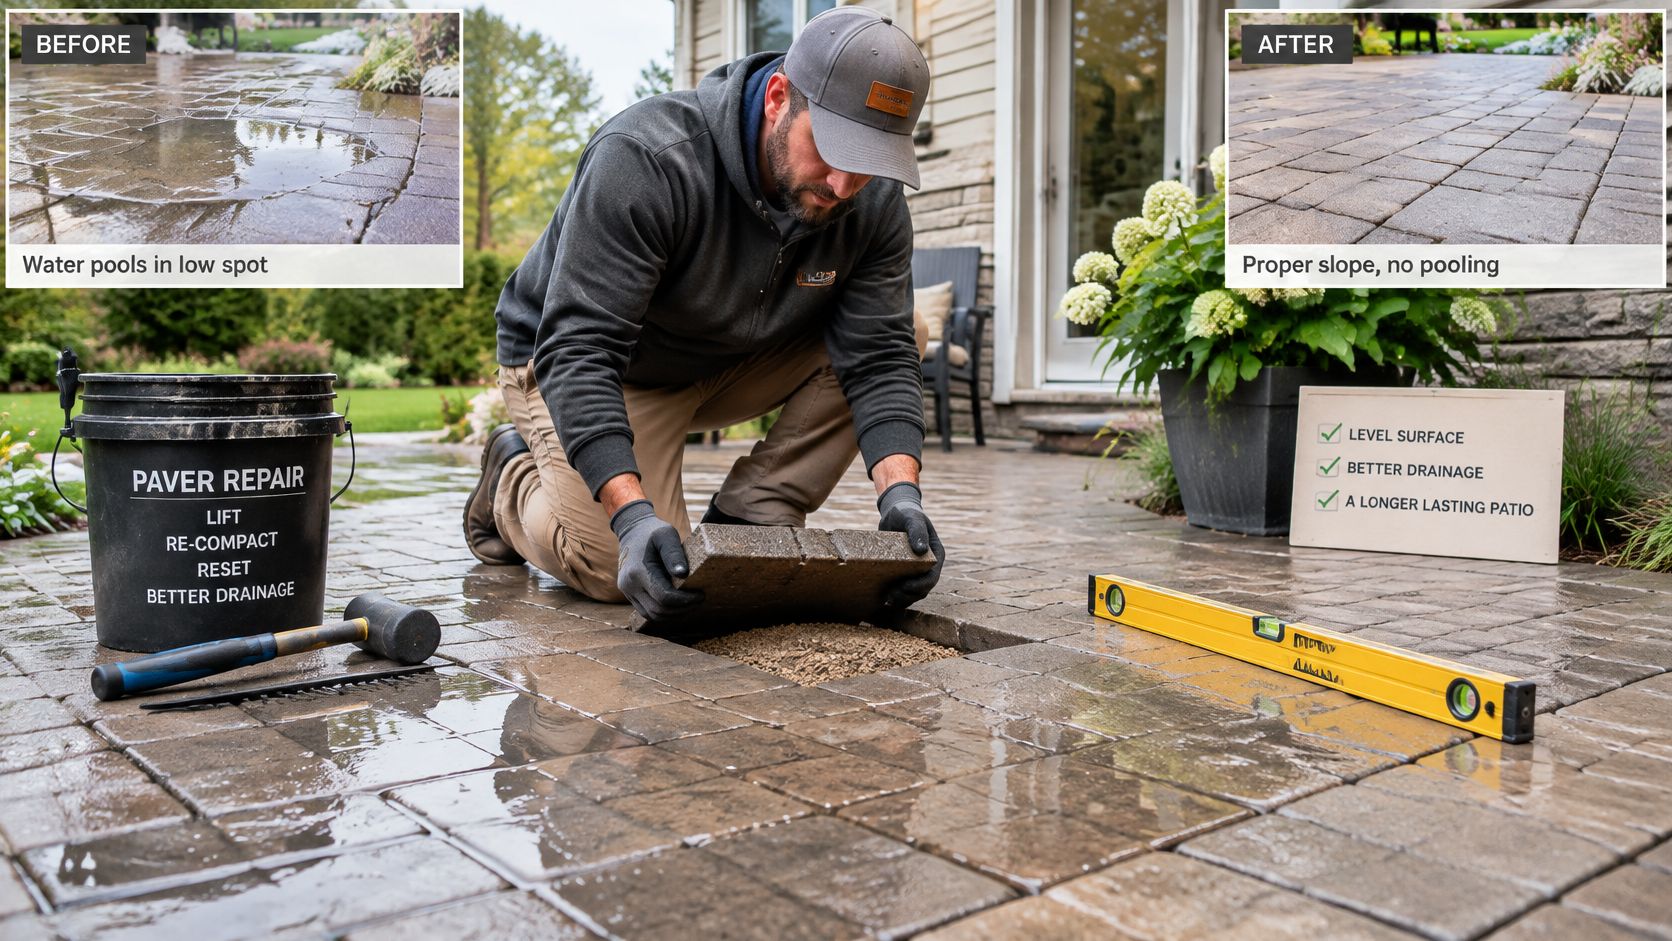
Most slope failures appear as a puddle, a chair that rocks, or water moving the wrong way. A paver patio works like a shallow roof: the surface has to direct water toward an outlet without feeling tilted underfoot. Pooling usually means a flat spot developed, the base settled unevenly, or the grade was wrong during construction. The repair should rebuild support below the pavers: lift the affected area, compact the base, set the correct fall, and reset the units so the fix lasts through the next storm.
What Causes Each Problem and What Fixes It
Patio tilts toward the house: The grade is reversed. Rebuild the base so water drains outward, then add an edge drain at the threshold to keep runoff away from the door and foundation.
Water runs toward the foundation: The outlet is missing or undersized. Add a swale or drain line that carries water to a safe discharge point. If runoff may be entering from an uphill bed or another part of the yard, DIY solutions for poor yard drainage can help you trace the source before correcting the patio surface.
Patio feels too steep for chairs: The drainage target and the comfort target were treated as separate goals. Reduce the fall toward the gentler end of the practical range, or create a level landing around seating and doorways while the surrounding field still drains.
Patio drops sharply to the yard: The edge transition was never planned. A gradual slope works for a small drop, while steps, a seat wall, or a retaining wall make a larger grade change easier and safer to cross.
Clay soil stays wet after rain: Clay absorbs water slowly and can shift as moisture changes, so surface fall alone may not be enough. The repair may need a deeper, well-compacted base and a clearly defined outlet.
Where runoff volume exceeds what surface grading can handle, permeable pavers designed for drainage can move water through the joints into a prepared base. They still need the right elevations and discharge path, especially on dense soil.
Retaining walls above a certain height, or those supporting patios or driveways, typically require engineering and permits. Check local requirements in Prescott, Prescott Valley, or Chino Valley before using one to correct a steep edge. For scale on accessibility, the 1991 ADA Standards state that each ramp run cannot rise more than 30 inches, while also recommending the least possible slope because gentler grades work for more users. The same planning principle helps on patios: use enough fall to move water, then flatten or terrace the places where people walk, turn, and sit.
Paver Patio Slope Questions Homeowners Ask
How Much Slope Should a Paver Patio Have
Aim for 1/8 to 1/4 inch per foot, about 1 to 2 percent, moving water away from the house. Start at the lower end on fast-draining soil and move up only when clay, long runs or a weak outlet call for it.
How Do I Calculate Patio Fall in Inches
Multiply the run in feet by your target in inches per foot. A 14-foot patio at 1/8 inch per foot falls 1.75 inches from the house edge to the far edge. Mark that drop on stakes and build the base to a string line set at that fall.
Do Paver Patios Need to Meet ADA Slope Rules
Not usually for private backyards. When the patio connects to an accessible route, though, keep the walking surface at 5 percent or less and cross slope at 2.08 percent or less so the surface drains without a difficult sideways tilt.
What Slope Works for Clay Soil
Use about 1/4 inch per foot, with a 6-inch or deeper compacted base, geotextile and a clear outlet. Clay holds water and moves with moisture changes, so it needs both stronger fall and a stronger foundation under the pavers.
Who Can Help Set My Patio Slope in Prescott
R.E. and Sons Landscaping is a licensed, bonded and insured design-build company serving Prescott, Prescott Valley, Chino Valley and Northern Arizona. We start with a consultation on slope, drainage and soil, then set finished elevations before digging. You can book online or by phone, Monday through Friday, 8am to 4pm.
If your patio pools after rain, tilts toward the house or feels unsteady under furniture, we can measure the fall in both directions, check your soil and outlet, and give you a clear plan to correct the grade at the base. Visit R.E. and Sons Landscaping to schedule a consultation for your Prescott, Prescott Valley or Chino Valley patio, and we'll help you set a slope that drains reliably and still feels level where you live on it.
Comments