
Dry Stack Natural Stone Wall Guide for Prescott Homes
Could a stone wall look perfectly fitted and still fail during Prescott's next monsoon? Yes. A dry stack natural stone wall succeeds because its foundation, stone placement, backward lean, and drainage work together, not because the visible face looks tight.
R.E. and Sons Landscaping helps homeowners in Prescott, Prescott Valley, Chino Valley, and surrounding Northern Arizona address sloped yards, erosion, drainage problems, and the need for usable outdoor space. Our retaining wall process starts with the property's soil, grade, water movement, and intended use, because decorative stonework and a wall supporting a driveway need different designs.
Dry Stack Wall Build Specs at a Glance
A dry stack wall stays up through friction, gravity, and careful batter. Stones must bear securely against one another, while the foundation spreads their weight and the wall's geometry helps resist movement.
The following values are starting points, not construction approval. In particular, the retaining-wall foundation entry isn't a substitute for an engineered foundation or an assessment of embedment.
Foundation and batter specs by wall type
Wall type | Foundation depth | Batter | Notes |
|---|---|---|---|
Freestanding landscape wall, stable soil, irregular fieldstone | 4-6 inches of compacted aggregate | 2-3 inches per vertical foot | Base extends at least 6 inches past both faces |
Freestanding landscape wall, stable soil, more regular stone | 4-6 inches of compacted aggregate | 1-2 inches per vertical foot | Keep the top narrower than the base |
Retaining wall, stable soil | 4-6 inches of compacted aggregate as an initial reference, subject to engineered design | Approximately 20%-30%, or 2.4-3.6 inches per vertical foot | Packing stones at least about 5 kg; engineering review required |
Dense, frost-prone or heavily loaded soil | 12-18 inches as an initial reference | Set by site-specific structural design | Site-specific engineering and permit review before construction |
What do the columns mean?
Foundation depth means the thickness of compacted aggregate beneath the stonework, not the wall's total buried depth. Batter means the intentional backward lean measured against vertical height. The notes identify construction details or review requirements that depth alone can't address.
Prescott's monsoon runoff, expansive or poorly draining soils, and winter freezing can move a yard out of the stable-soil category. That doesn't mean every Northern Arizona wall needs the deepest foundation. It means soil conditions must be established before choosing a section.
Practical rule: Choose the wall's function first, then assess the ground. Don't choose foundation depth from the stone's appearance.
At R.E. and Sons Landscaping, we treat these values as starting points adjusted to each site. Identify whether your wall is freestanding or retaining, establish its proposed height, and determine the soil conditions before selecting a row. Any wall holding back soil beneath a driveway or structure needs engineering, regardless of how modest its visible face looks.
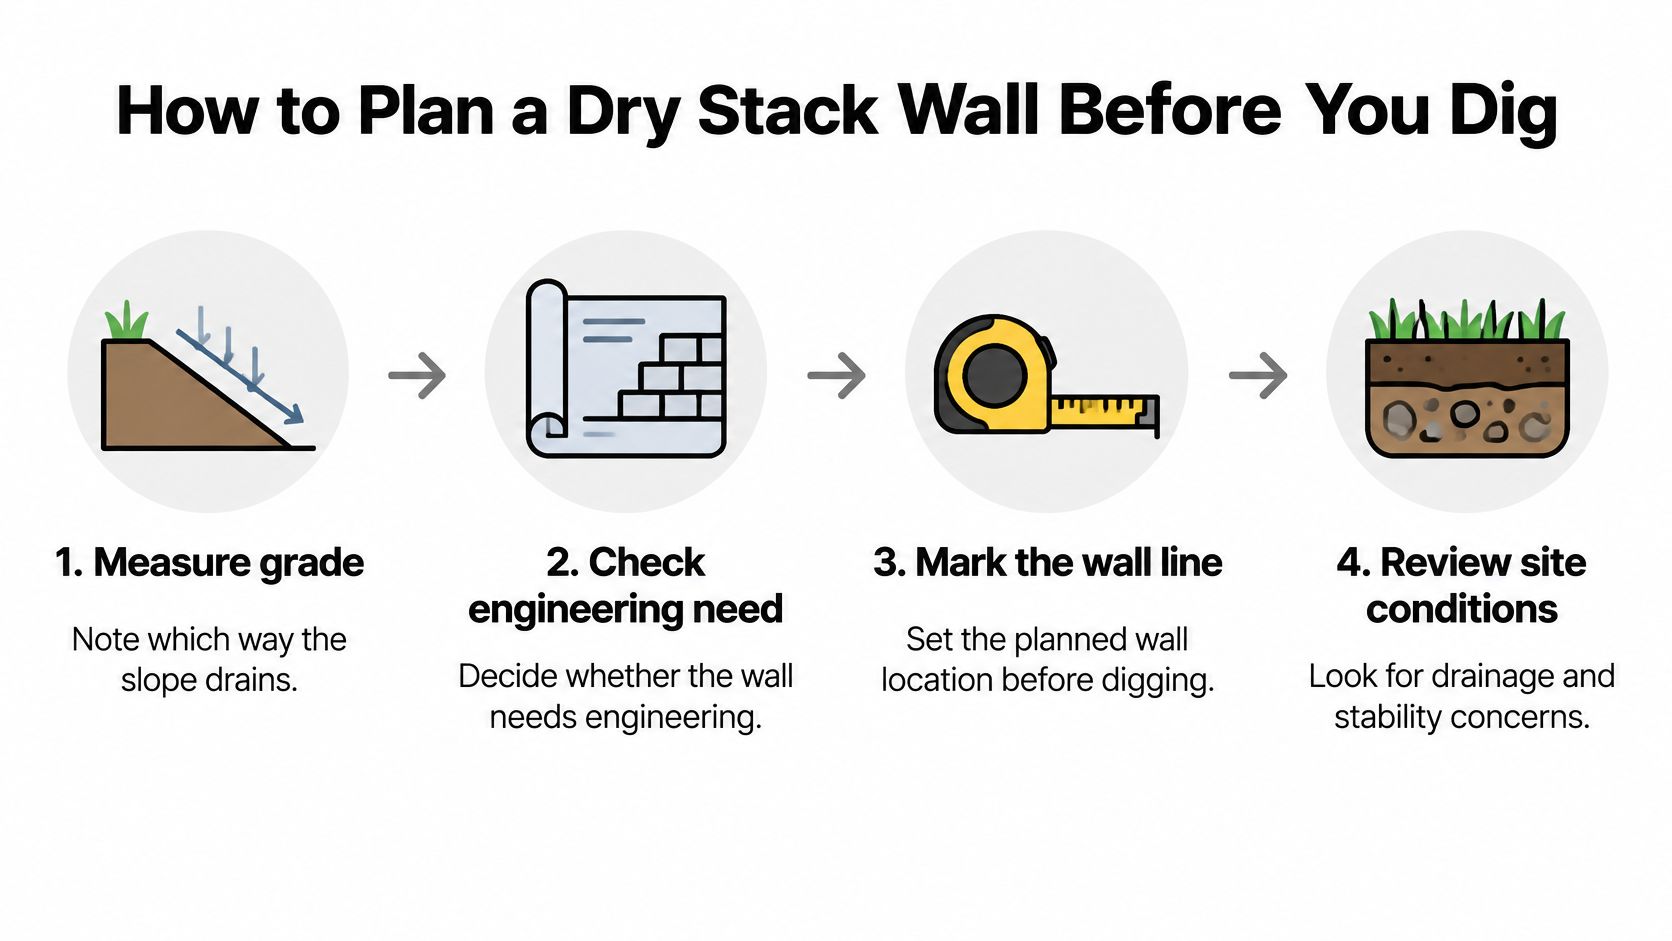
How to Plan a Dry Stack Wall Before You Dig
Planning establishes whether the wall needs engineering, which is the decision homeowners most easily underestimate. A garden border becomes a retaining structure when it holds back a grade, even if the exposed stone looks decorative.
Use a builder's level or laser level, measuring tape, stakes, and mason's string to establish the proposed wall line. Arrange utility locating before test digging or excavation.
What should you check on the property?
Measure the grade and drainage direction. Record ground elevations along the proposed line and look for runoff entering from uphill properties, downspouts, or paved areas. Water direction determines where interception and discharge need to happen.
Mark the wall's dimensions and loads. Identify its proposed height and length, then mark nearby patios, driveways, sheds, and planters. Their weight and position can change the structural design even when they don't touch the wall.
Inspect the soil after rain. A safely located shallow test hole can reveal persistent wetness, fine silt, clay, or loose fill. This is an initial observation, not a replacement for geotechnical assessment where poor ground or structural loads are involved.
Confirm approval requirements. Under the City of Prescott engineering requirements, retaining walls, including boulder and dry-stack walls, may require site-plan approval or a permit through the Building Division, with plans identifying location, cross-section, boulder size, embedment, height, batter, backfill, drainage, ground slope, and surcharge loading. Calling the wall decorative doesn't remove the need to assess what it supports.
Book an on-site consultation. Our retaining wall projects start with a free consultation assessing slope, drainage, soil conditions, and what you want the space to do. That assessment comes before an engineered layout, rather than forcing a standard detail onto the property.
The planning flow keeps site assessment ahead of excavation.
When is the project ready to proceed?
A wall may be only part of the solution on an eroding lot. Our guide to slope stabilization methods explains the broader choices worth considering before committing to stonework.
Use this go-or-no-go check:
Height: Proposed wall height and retained grade are established.
Load: Nearby structures, hardscape, and vehicle loads are identified.
Soil: Bearing conditions and drainage concerns are understood.
Water: Runoff has a planned route and discharge location.
Approval: Engineering and permit requirements are confirmed.
If a critical item is unresolved, pause excavation. Moving a string line is easier than rebuilding a loaded wall.
How to Build the Foundation and Choose Stone
The foundation determines whether the stonework above it remains seated. Build from competent ground upward, and choose stones for their bearing surfaces and depth into the wall, not just their color.
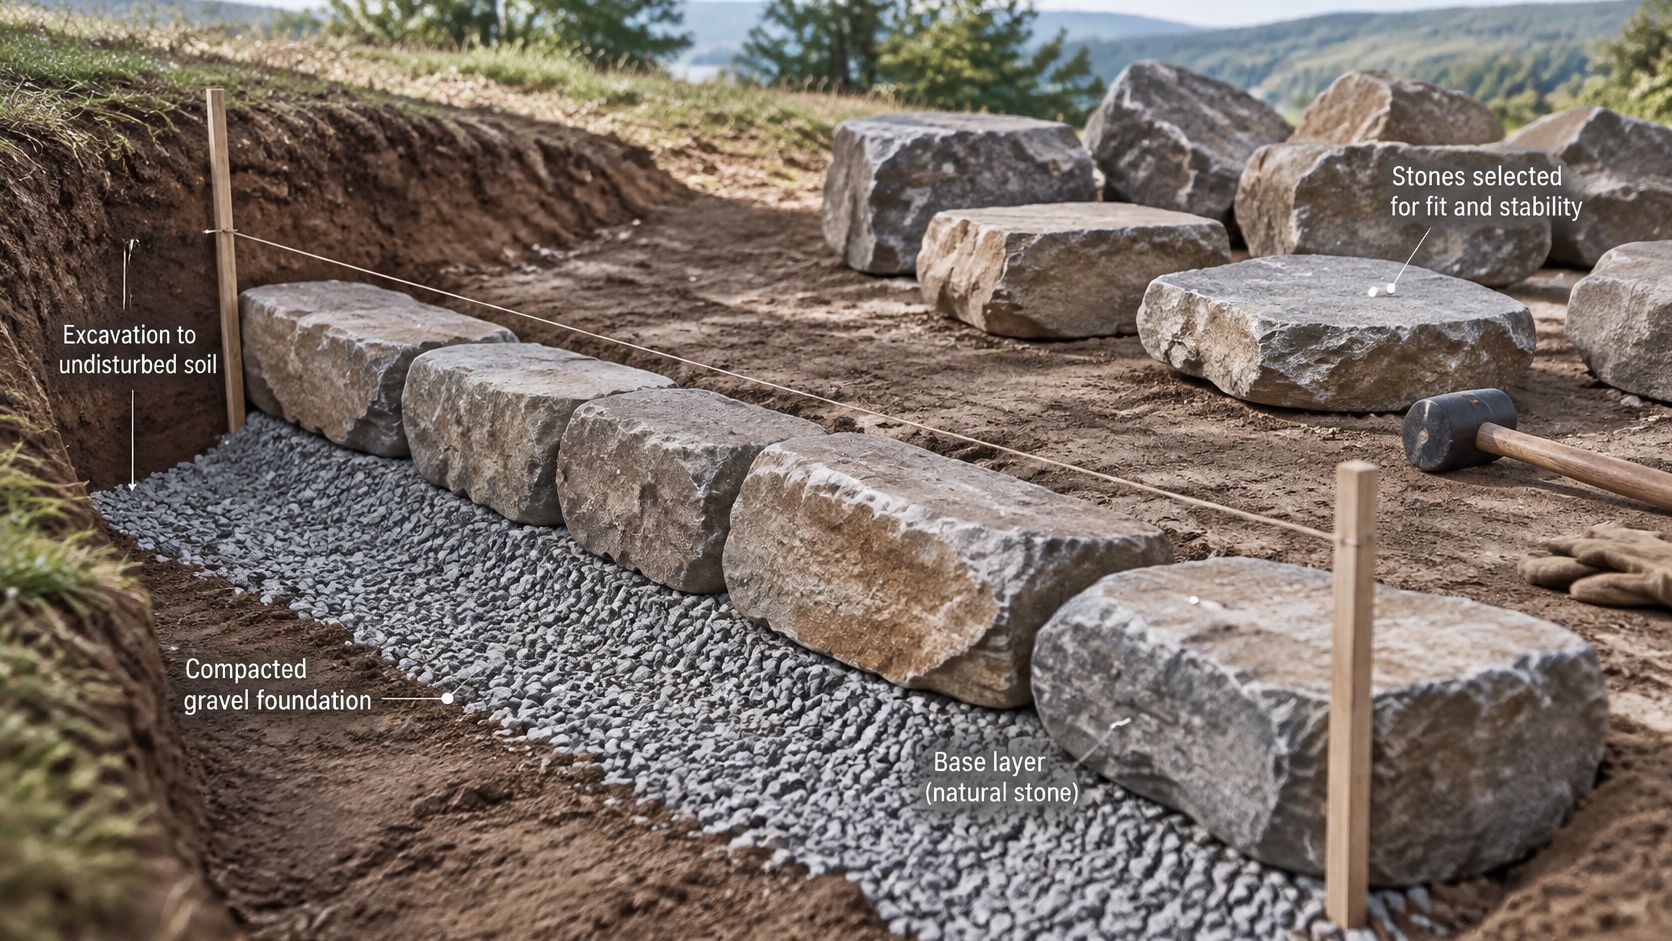
The foundation stage should leave the crew with a clean, compacted working base.
How should the base and lower courses be built?
Remove topsoil, roots, organic pockets, and loose material until excavation reaches competent soil. Don't hide soft ground beneath additional aggregate. If the excavation exposes wet fill or unstable material, resolve that condition before setting stone.
For small-scale projects, the American Society of Landscape Architects' dry-stacked stone guidance describes free-draining angular aggregate placed in 2-3-inch compacted lifts, with a base extending at least 6 inches beyond both faces, typical foundation depths of 4-6 inches in stable soil and approximately 12-18 inches in dense, frost-prone, or heavily loaded ground, and batter of approximately 2-3 inches per vertical foot for irregular fieldstone or 1-2 inches for more regular stone.
Compact each lift before adding the next. A plate compactor can consolidate accessible aggregate, while confined edges need suitable hand-compaction equipment. Dumping the entire foundation depth into the trench and compacting only its surface leaves the lower material uncertain.
Set the largest, flattest stones first. Check their bearing front to back and side to side with a spirit level, while maintaining the designed wall geometry. Each stone should sit firmly without rocking or spanning an unsupported pocket.
What makes the stones lock together?
Build the wall's full thickness as the courses rise. A tidy face with loose rubble dumped behind it isn't an interlocked wall.
Overlap the joints. Place upper stones across joints below instead of building vertical seams.
Tie the faces together. Use long through-stones at intervals, with their long dimension extending into the wall.
Pack deliberately. Fit sound packing stones into internal spaces rather than balancing exposed stones on loose face wedges.
Check the batter. Use a battered profile frame and string line to keep the lean consistent.
Test before continuing. Apply hand pressure to each seated stone. Reset anything that shifts before loading it with another course.
The dry-stone retaining-wall technical guide recommends approximately 20%-30% face batter for many retaining sections, equivalent to 2.4-3.6 inches per vertical foot, and describes masonry packing stones weighing at least about 5 kilograms, alongside stepped backfill preparation.
Those are retaining-wall principles, not permission to impose the same section everywhere. Stepped preparation must follow the design so the wall transfers its load into competent ground. Don't excavate an unsupported slope just to create steps.
A stone that looks good but rocks under hand pressure is the wrong stone in that position.
This video provides an additional visual reference for dry-stone construction.
Which stone is suitable for the job?
Dry-lay a sample course before committing to the material. Select thick, durable face stones with useful bearing surfaces and a workable mix of sizes. Orient long stones into the wall rather than displaying their entire length along the face; avoid loading fragile laminations on edge.
Stone types compared for Prescott walls
Stone type | Best use | Notes |
|---|---|---|
Flagstone | Clean, even courses and low garden walls | Thickness must suit the face; each stone must sit without rocking |
Boulders | Bold landscape walls and larger packing | Heavy stones add mass; placement and lifting access require careful planning |
Natural stone or segmental block | Predictable lines on Prescott retaining walls | Select suitably shaped stone or an engineered block system; engineering review still required |
Segmental block, natural stone, and boulders are the top retaining-wall choices in Prescott, but they aren't interchangeable construction systems. Our comparison of retaining wall blocks helps clarify when manufactured geometry is preferable to individually fitted stone.
Ask where stone originates and how it will reach the site. Local sourcing deserves consideration alongside suitability, handling, and waste, not as an excuse to use poorly shaped material.
Our project process includes consultation and site assessment, engineering and design, excavation and base preparation, wall construction, drainage installation, backfill and compaction, and a final walkthrough. Backfill and drainage must advance with the wall, and walls beyond ordinary garden scale need structural design rather than a taller version of a garden-wall detail.
Drainage and Freeze-Thaw Detailing for Prescott Sites
Drainage is the most consequential failure-control measure for a dry stack wall in Prescott. Intense monsoon runoff can deliver water faster than a poorly arranged yard can shed it, while winter freezing makes trapped moisture another source of movement.
Start above the wall. Grade the adjacent surface so it doesn't funnel runoff into the retained soil, and give the foundation a drainage strategy that doesn't create a low, water-holding trench.
How should the drainage layers work?
Install clean, angular drainage stone in a continuous zone behind the wall. Keep excavated fines out of that zone, and compact structural backfill in thin lifts using equipment and working distances appropriate to the design.
Where fine soil could migrate into the drainage aggregate, use a filter-compatible geotextile. The fabric must separate materials while allowing the required water movement. Arbitrary fabric wrapped around an already muddy drainage zone won't correct contaminated aggregate.
The City of Whittlesea dry stone wall design guidelines provide technical guidance for considering drainage alongside ground conditions and wall design. For a Prescott property, that means assessing seepage, soil permeability, groundwater, and frost exposure before selecting the drain arrangement.
The drainage system needs a maintainable discharge point, not merely a buried pipe.
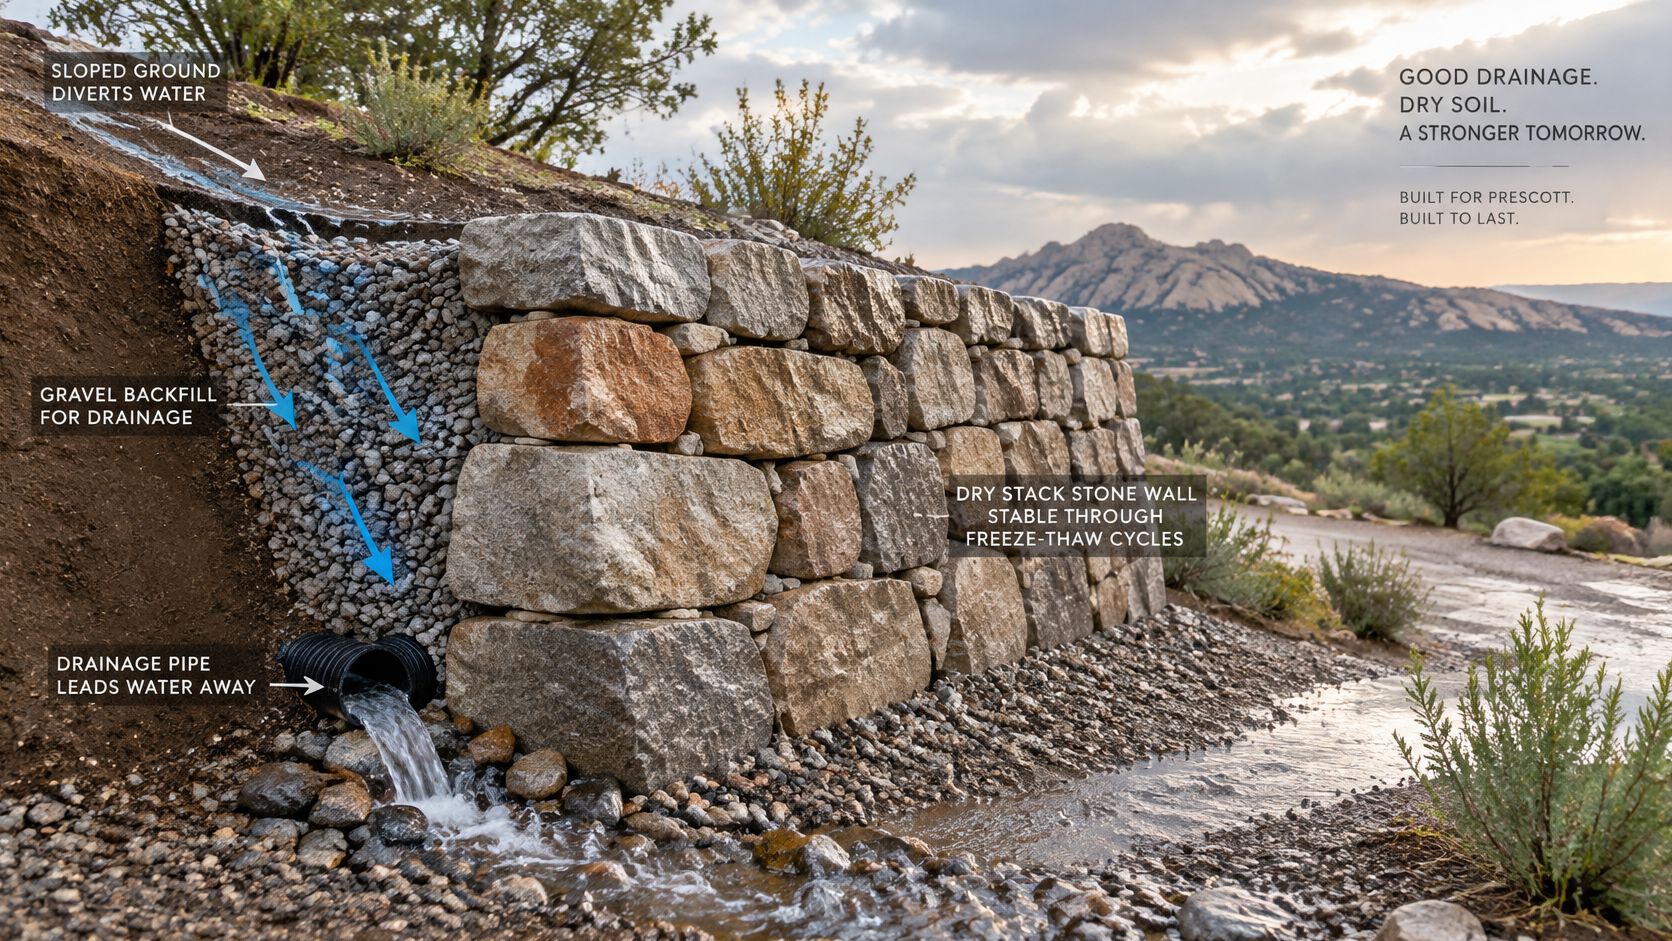
Open joints allow distributed drainage, but they aren't a stormwater inlet. Never route concentrated runoff through the wall. Oversized gaps, clogged voids, roots, and poorly rebuilt sections can channel water into vulnerable areas and wash material out.
Our retaining wall drainage guide explains why the collection zone, pipe where required, and discharge location must function as a complete system.
What should you inspect after a storm?
Check from a safe position without climbing a suspect wall:
Aggregate condition: Look for sediment contamination at accessible inspection points.
Outlets: Remove accessible surface debris without excavating behind loaded stonework.
Top grading: Confirm runoff moves along its intended route rather than entering behind the wall.
Ponding: Investigate standing water after rainfall or irrigation.
Washout: Look for fresh soil deposits, missing packing, or new gaps beneath stones.
At R.E. and Sons Landscaping, retaining walls are engineered for load, drainage, and freeze-thaw cycles. Sites with seepage need engineering review and a designed drain and outfall before construction. Keep that outlet accessible and clear of vegetation and combustible debris so drainage maintenance also supports defensible-space upkeep.
Common Mistakes and How to Fix Them
A leaning or bulging wall is a structural warning, not a cosmetic defect. Too little batter or a narrow base can contribute, but saturated backfill and foundation movement must also be investigated before rebuilding the lower courses.
Adding larger capstones won't correct an unstable base. Neither will sealing the face to hide gaps.
Dry stack wall symptoms, causes and fixes
Symptom | Likely cause | Fix |
|---|---|---|
Wall leaning or bulging | Too little batter or a base that is too narrow | Rebuild lower courses with correct batter and an extended base after assessing drainage and ground movement |
Water pooling behind the wall after rain | Clogged or missing drainage aggregate, no outlet | Clear accessible voids; add clean drainage stone and a maintainable outlet under a safe repair plan |
Stones rocking under hand pressure | Stones resting on small wedges, no overlap | Reset the course with larger flat base stones and through-stones |
Visible vertical joints | Courses stacked directly over one another | Offset joints and add through-stones |
Cracked caulk or joints after winter | Tight jointing that traps freezing water | Use dry joints and clean-stone backfill for genuine dry-stack construction |
Debris or dry plants stuck in joints | Vegetation and leaves in the wall face | Clear debris and keep noncombustible surfaces near the house |
Should dry-stack joints be sealed?
Don't turn a mortarless stone wall into a sealed shell without a designed reason. Northern Arizona University's 2025 design guidelines specifically identify Northern Arizona freeze/thaw cycles as a reason to minimize caulk joints.
Dry joints and clean-stone backfill allow drainage and some movement. Trapped water can freeze and expand, pushing outward instead.
Material sourcing also deserves scrutiny: the whole-life-emissions review summarized with this guidance reports that locally based stone can reduce embodied greenhouse-gas emissions by 2%-84% compared with imported stone, depending on origin and transport. Treat that broad range as a sourcing consideration, not a guaranteed reduction for a Prescott project.
How does wildfire-conscious detailing fit in?
Stone doesn't make a property fireproof. Noncombustible rock, flagstone, or concrete near the house and breaks between vegetation can reduce fuel continuity, but leaves and dry plants lodged in joints still need removal.
Keep the wall's drainage spaces free of soil buildup and its exposed joints free of combustible debris.
Accessible leaf removal and outlet cleaning may fit into a day's maintenance. Resetting several courses requires unloading and rebuilding safely, not pulling supporting stones from a loaded face. Call for engineering review when movement is progressive, the wall supports hardscape or vehicles, or seepage and ground movement are present.
Dry Stack Wall Questions Homeowners Ask
How long does a dry stack wall last?
A well-built, well-drained wall can serve for many years, but there's no honest universal lifespan. Foundation condition, batter, stone quality, drainage, and periodic repair matter more than a promise based on the material alone.
Inspect after significant runoff and address loose stones or changing alignment promptly. Waiting until a bulge becomes pronounced usually makes the repair more involved.
Can I build a dry stack wall myself?
A careful homeowner can build a low freestanding wall on stable soil using sound foundation and stacking methods. Retaining walls, walls supporting driveways or structures, and projects subject to local approval requirements need professional review, with engineering and permits as applicable.
We coordinate retaining-wall engineering and permitting as part of project management. Most of our retaining wall projects take one to three weeks from start to finish, depending on height, length, and permitting requirements.
Can I repair an old historic stone wall?
Yes, but preserve its original construction rather than treating it as disposable material. The National Park Service's preservation guidance recommends using historical images and documentation, following the existing foundation, and resetting stones with the established dry-stacking method.
Bring in a qualified structural engineer, architect, or architectural conservator experienced in historic masonry before dismantling structurally significant work. We can assess the site context and coordinate appropriate specialist review.
Does a stone wall make my property fireproof?
No. A stone wall is noncombustible, but it doesn't eliminate exposure from nearby vegetation, accumulated debris, or other combustible parts of the property.
Use it within a broader defensible-space approach rather than as a stand-alone fire barrier. Preserve access for clearing debris and maintaining the surrounding area.
R.E. and Sons Landscaping offers site-specific assessment, design coordination, and construction for dry stack natural stone walls and retaining walls across Prescott, Prescott Valley, Chino Valley, and surrounding Northern Arizona. Visit R.E. and Sons Landscaping to schedule a free retaining wall consultation and have your slope, soil, drainage, and intended use assessed before excavation.
Comments