
Backyard Putting Green Flags for Better Practice
You're standing in your Prescott backyard with a new putting green taking shape, phone in hand, staring at dozens of flags that all look fine in photos. One has solar lights. One has a logo. One is oversized. None tells you whether it'll help you practice, fit your cup, or hold up in Northern Arizona heat.
That's the problem R.E. and Sons Landscaping solves for homeowners in Prescott, Prescott Valley, Chino Valley, and nearby Northern Arizona communities. We design and install custom putting greens as complete systems. That means the surface, cup, drainage, and backyard putting green flags work together instead of competing with each other.
You're joining a large and growing group of golfers. The National Golf Foundation reported 47.2 million Americans participated in golf in some form during 2024, and the USGA reported 3.35 million golfers posted more than 77 million scores that year, as noted in USGA reporting on 2024 golf participation and score posting. A home green gives that interest a real target. The flag is how you find it, line up to it, and judge whether your practice is honest.
Finding the Right Flags for Your Backyard Green
Buy the flag for its job, not its decoration. A good assembly has to identify the cup from every approach angle, give you a believable target to aim at, stay stable while you putt, and fit the cup without snagging fabric or bouncing putts away from the hole.
That job is older than many realize. The first known mention of a flagstick in the Rules of Golf appeared in the R&A code of 1875, and a 1857 newspaper report about the Old Course at St Andrews described a two flag per green arrangement, as traced in Golf.com's history of the flagstick and its formal rules. The flag was never just trim. It's a standardized visual marker, and your backyard version should work the same way.
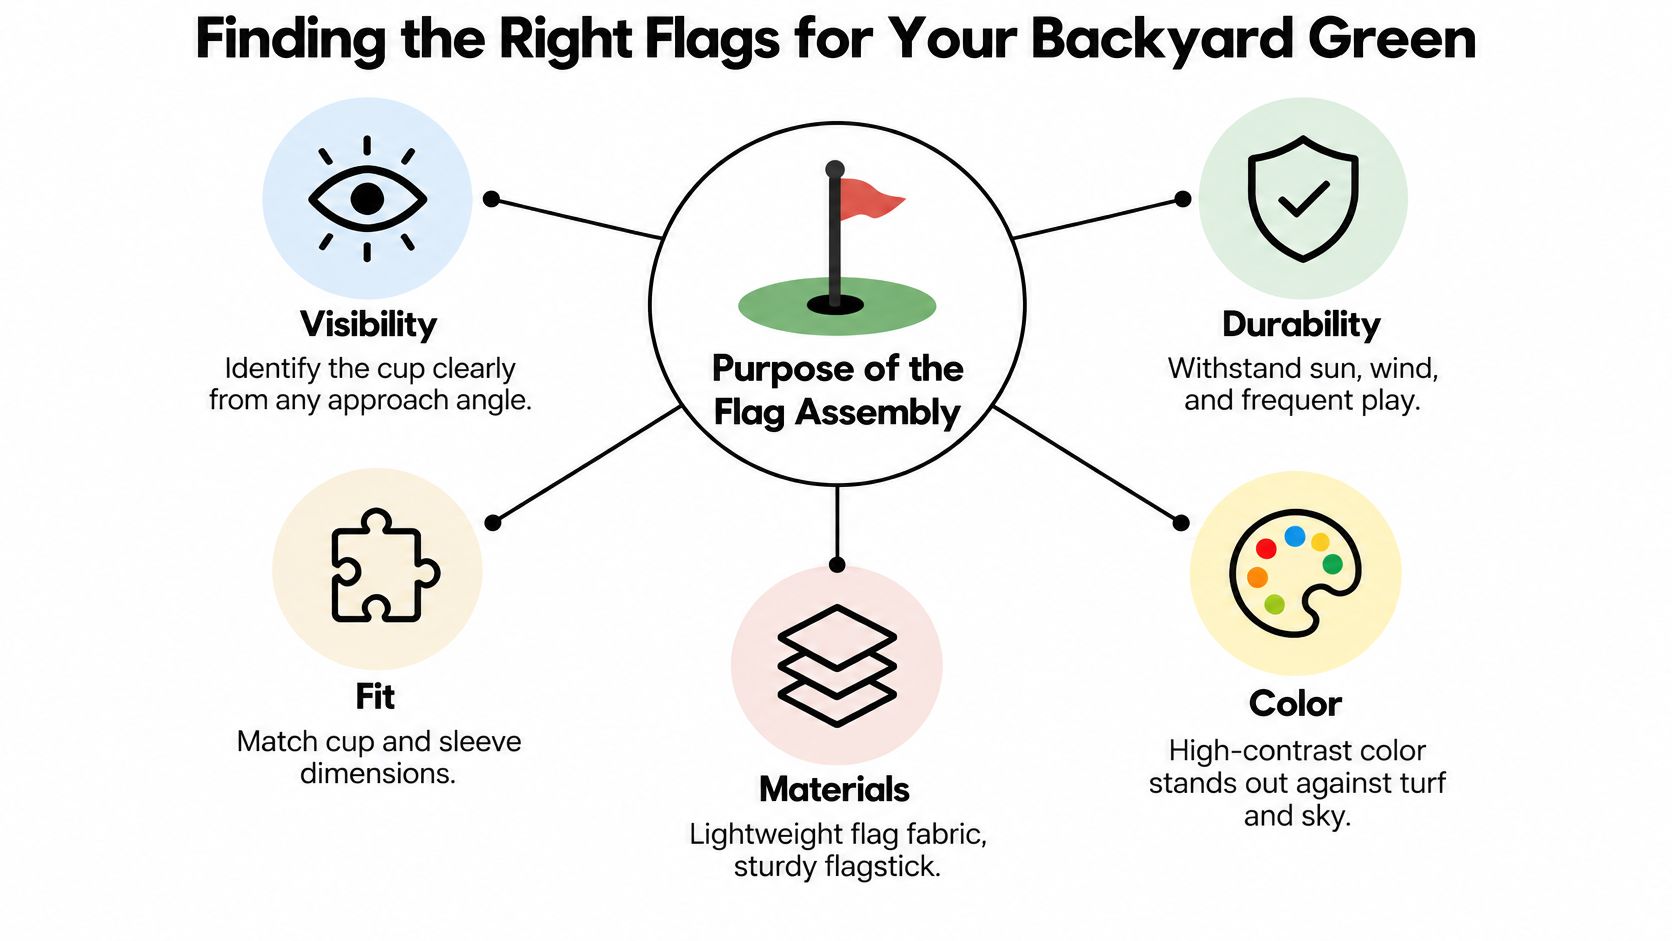
What should a backyard flag actually do
Start with these checks before you look at colors or logos.
Visibility from every angle: Walk the green and confirm you can spot the flag clearly against turf, sky, walls, and plants.
Stable fit: The flagstick should sit firmly in the cup socket without leaning, rattling, or binding when you pull it.
Clean ball behavior: Nothing near the cup should catch the ball, deflect it, or add rebound that a real cup wouldn't produce.
Outdoor durability: Fabric and fittings need to handle sun, wind, and frequent handling in Northern Arizona conditions.
If you want ideas on fabric weight, colors, and personalization once those basics are covered, this guide to putting green flag materials and personalization from Modern Yard Landscapes is a useful next read. Treat personalization as the last decision, not the first.
Practical rule: If a flag looks great but leans, spins in the socket, or hides against your fence line, it isn't a practice tool. It's yard art.
R.E. and Sons Landscaping is a Prescott based design build contractor, and this is exactly how we frame flag choices during a consultation. Tell us whether the green is for serious practice, family games, or entertaining, and we'll match the hardware to that use instead of selling you whatever photographs best.
Choosing Flagstick Sizes and Flag Materials
Separate the assembly into four parts and judge each one on its own. You've got the pole, the socket or sleeve that connects it to the cup, the flag fabric, and any decorative details. Most bad purchases happen when someone judges all four by the fabric alone.
Does shaft diameter really matter at home
Yes, if you want realistic practice. USGA equipment rules say a flagstick must not contain features intended to influence ball movement, measure wind speed or direction, or serve a purpose beyond identifying the hole, according to USGA equipment rules for flagsticks. The same specification caps the shaft at 2 inches (50.8 millimeters) in diameter on the upper section and 0.75 inches (19 millimeters) in the zone near the putting surface, and the pole must be circular in cross section.
Your backyard doesn't need tournament certification. But those numbers are a smart benchmark. A pole that's much thicker near the cup changes how a ball reacts when it arrives with the flag in. A pole that's bent or wobbly gives you a moving aiming point. Ask about diameter and straightness before you ask about color.
Which materials hold up outdoors
There's no single best material, so compare by how you'll use the green.
Flagstick: Look for a sturdy, straight pole that doesn't flex excessively or feel fragile when kids pull it. Weight matters. Too light and wind moves it. Too heavy and it's awkward to tend.
Flag fabric: Choose lightweight fabric that hangs and moves naturally, with stitching you can inspect. Replaceable flag fabric is worth prioritizing because sun fades fabric long before a good pole wears out.
Fittings and attachments: Pick smooth connections that won't snag fabric or fingers. Rigid ornaments, oversized attachments, and chunky decorations near the cup create rebound and collision problems.
Decorative extras: Logos, team colors, and themed designs are fine for entertaining yards. Keep them on the fabric, not on hardware near the ball.
Think about who is putting, too. Children and older players need a target that's easy to see without being so oversized it dominates a small green. A flag that's too tall or top heavy is harder for a child to pull and replace cleanly. Size the whole assembly to your shortest regular player, not your tallest.
More decoration is not automatically better. Every rigid add on you bolt to a flagstick is something else to fade, loosen, snag, or knock a putt off line.
Bring this checklist to any supplier or installer in Prescott or Prescott Valley. Shaft diameter, straightness, cup compatibility, replaceable fabric, visibility, and no snag prone attachments. If a seller can't answer those questions, buy your backyard putting green flags somewhere else.
Matching the Cup Flag and Decorative Style
Match the cup and flag to the experience you want. A golfer drilling six footers in Prescott Valley needs a different target than a family running weekend putting contests, and both need something different from a homeowner who mostly wants the green to look sharp from the patio.
If you want standard golf dimensions, build to a 4.25 inch diameter hole at least 4 inches deep, with a liner, when used, no greater than 4.25 inches in outer diameter and set at least 1 inch below the putting surface under suitable soil conditions, as set out in standard golf hole dimension specifications. Those figures are reference points. Your yard scale, surface, and drainage may call for adaptation, and that's fine as long as you know what you're trading away.
Choose the cup and flag combination
Primary use | Cup and flag priority | What to avoid | Best fit |
|---|---|---|---|
Serious practice | Regulation style cup, slim straight flagstick, plain high contrast flag | Oversized flags, rigid ornaments, shallow cups | Golfers who practice with the flag in and out |
Family recreation | Durable cup, easy grip pole, replaceable colorful fabric | Heavy poles, sharp fittings, hard to replace fabric | Mixed ages, casual games, frequent handling |
Decorative emphasis | Clean cup fit, logo or themed flag, colors tied to the landscape | Decoration that hides the target or crowds a small green | Entertaining yards where looks lead |
Simple replacement flags win on maintenance. You swap faded fabric and keep putting. Logo and color options add personality, and if you enjoy that side of the game, browsing stylish accessories for golfers from Tattoo Golf can spark ideas you can adapt to flag colors and backyard styling. Heavily themed designs cost you realism and usually show sun damage first, because bold prints fade unevenly.
Visibility should settle close calls. A flag color that blends into your block wall, desert landscaping, or evening sky fails its main job no matter how good it looks at noon. Check contrast at the times you'll putt, including early morning and dusk.
If you're unsure, here's my recommendation. Buy a stable, compatible, high contrast target first. Add personality through replaceable fabric later. You can change a flag's look in minutes. You can't easily fix a cup and pole combination that never fit right.
Planning Flag Placement and Practice Layouts
Flag placement decides what you can practice. Put the cup in the wrong spot and you'll get a pretty green that teaches you nothing, or worse, a target sitting in a wet low point that fails early. Work through placement before anything is cut or set.
Use this infographic as a layout overview before you mark a single cup location.
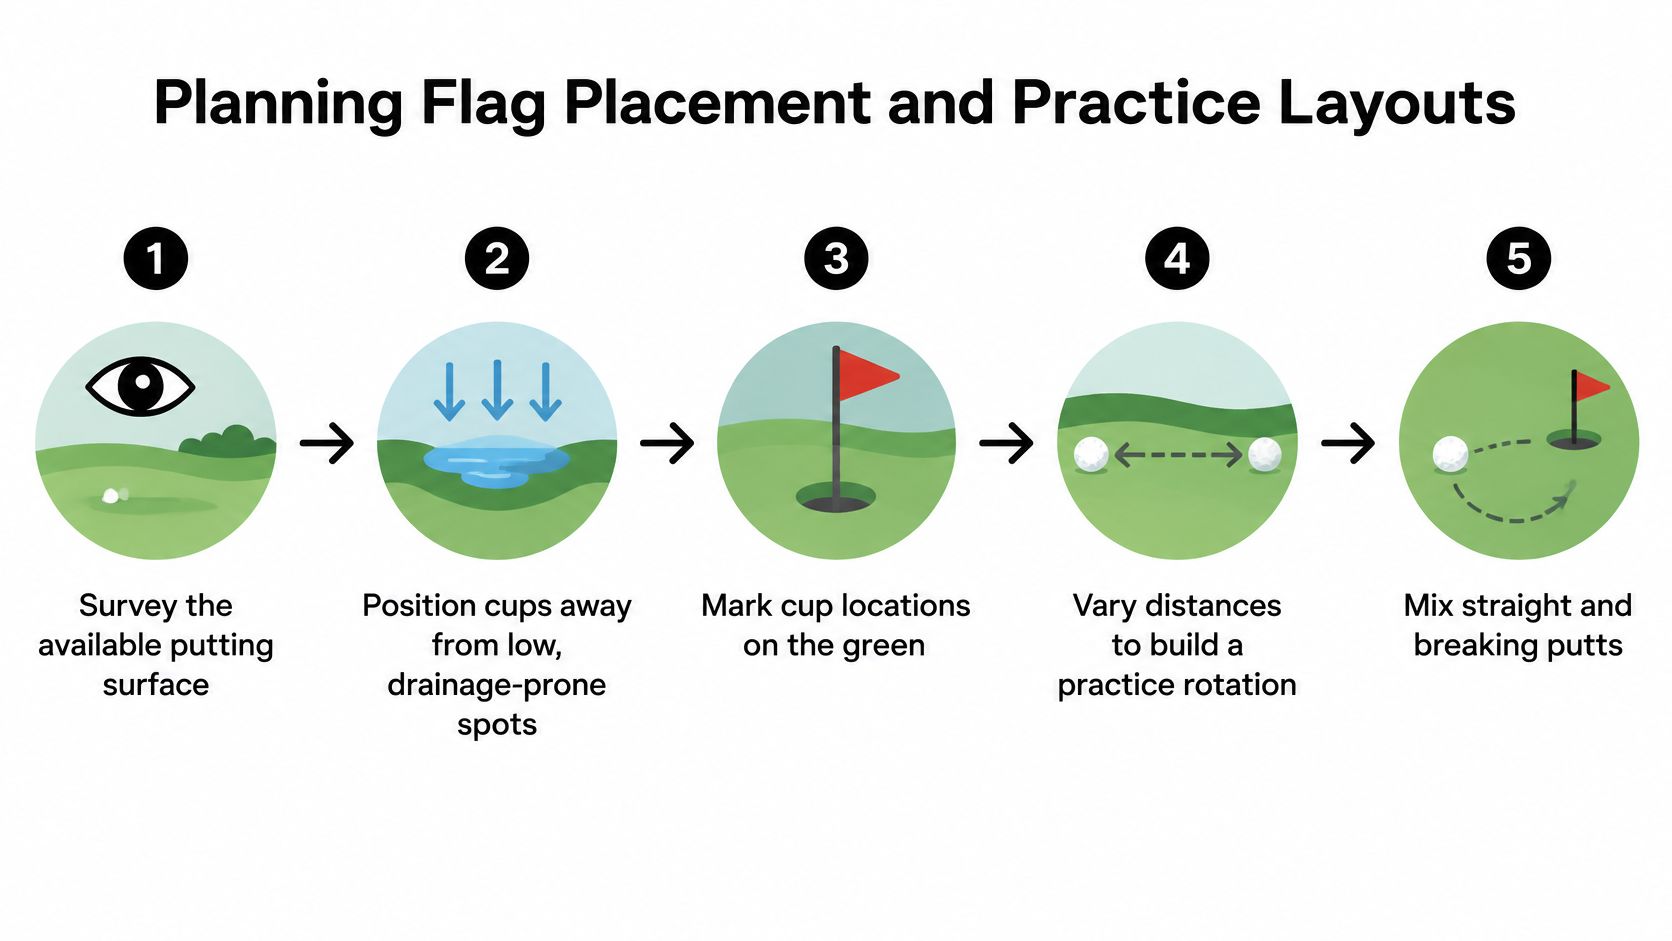
Start by surveying the surface you have. Mark candidate cup spots away from drainage low points and away from abrupt contour transitions where a slope changes direction. Then stand at every realistic putting position and check the sightline. You need at least one believable straight putt and, if space allows, one gently breaking line that holds its read repeatably.
Which layout fits your yard
Single cup, straight putt focus: Best for small Prescott courtyards. You groove alignment and pace on one honest line from several distances.
Two cup rotation: Gives you different angles and breaks without crowding. It's the sweet spot for most family greens in Chino Valley and Prescott Valley.
Larger training pattern: Multiple cups let you build a practice circuit. Only choose this if each cup still gets proper drainage, level support, and clear walking room.
Keep cups clear of paths, pool edges, fire features, and property lines where a chased ball or a backing up child creates a hazard. Leave maintenance access around every cup so you can brush turf and check infill without trampling the same fringe area daily.
For a fuller look at how contours, size, and cup positions come together, review our guidance on backyard putting green design and layout planning before you finalize positions.
Watch how a planned layout translates into real putting lines in this video walkthrough.
Different players may need different targets. A child learning pace benefits from shorter, flatter putts, while an experienced golfer wants a breaking test. Two well placed cups with repositionable flags handle both without forcing everyone onto one compromised line. Placement is a practice decision and a drainage decision. Treat it as both.
Installing the Cup and Flag Assembly
Treat the cup as a precision drainage and surface level component, not a sleeve you shove into turf. Most flag problems homeowners blame on hardware are base and drainage problems underneath it.
Confirm your finished grade and compacted subgrade first. USGA construction guidance requires the subgrade to be smooth, firm, and free of water holding depressions, with drainage built before the surface goes down, including a 4 inch minimum main drain pipe, laterals no more than 15 feet apart, a continuous pipe slope of at least 0.5%, at least 4 inches of gravel drainage layer, and roughly 12 inches of uniform sand based rootzone in a USGA style assembly, per USGA putting green construction guidance. A backyard synthetic green adapts that assembly, but the principle doesn't change. Water needs somewhere to go before you set hardware.
This photo shows the cup and flag installation sequence on a finished professional green.
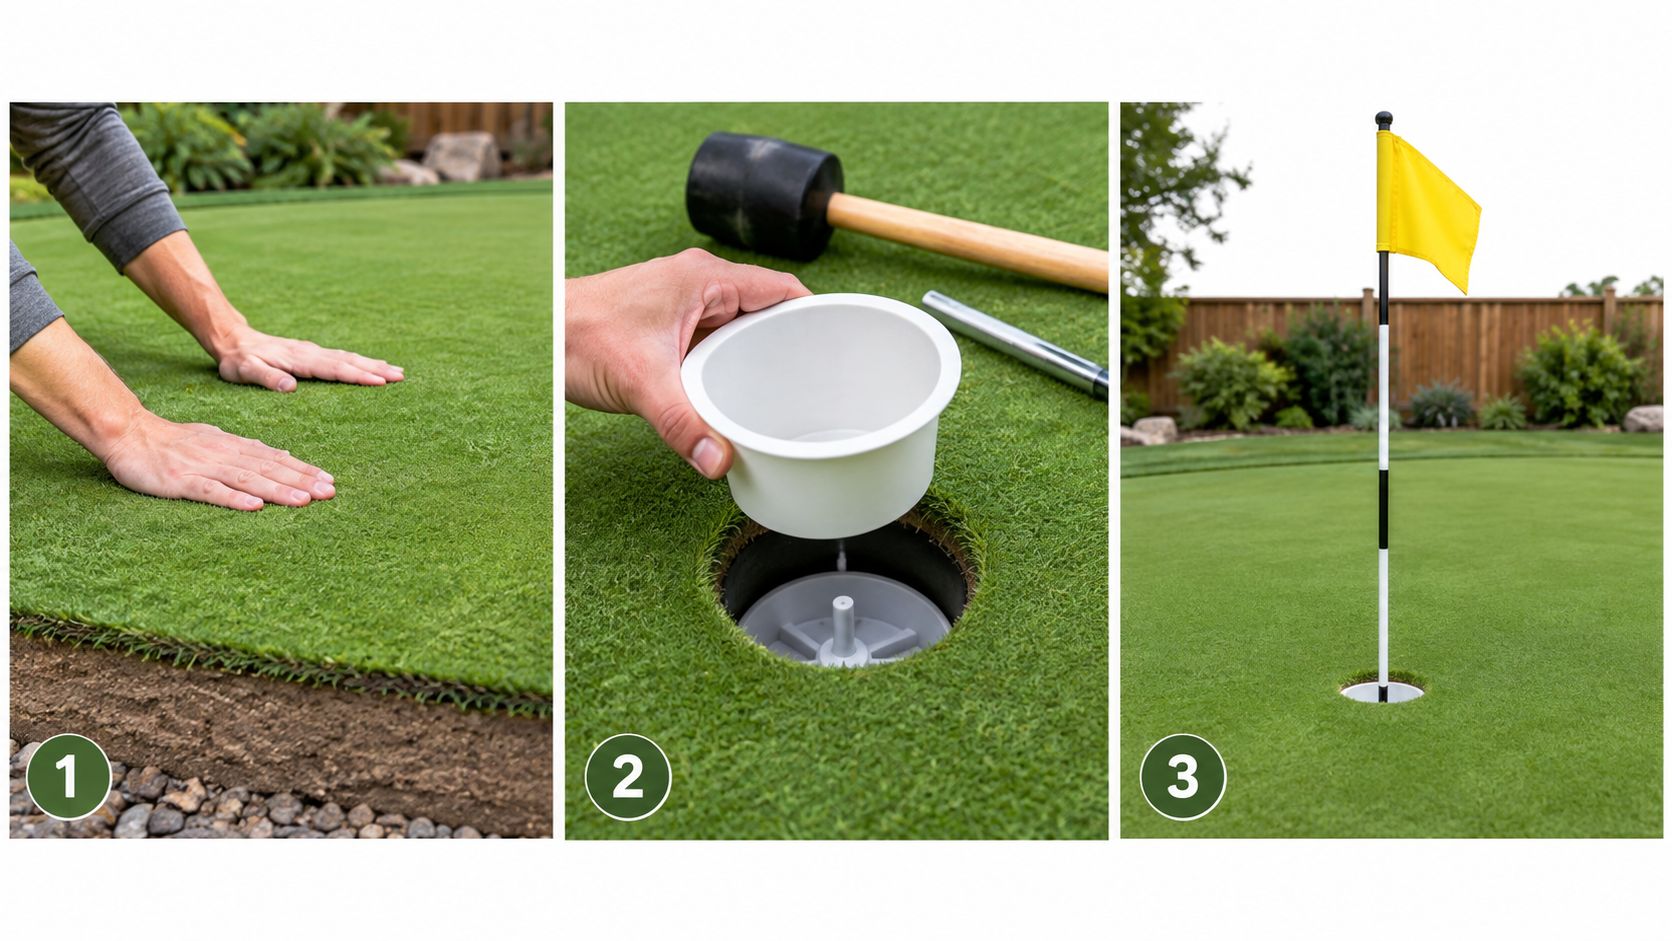
Setting the cup so putts stay honest
Set the cup so its rim finishes exactly flush with the putting surface. Support the sleeve with firm, non settling material so it can't drop or rotate. Check level from multiple directions, not just one, because a cup can look fine from the side you set it on and still tilt toward your main putting line.
A raised, tilted, or settled cup creates a repeatable lip defect. Putts that should drop get rejected, and you'll start changing your stroke to compensate for a hardware flaw. Irrigation and freeze thaw movement in Northern Arizona make a marginal installation worse, not better. Keep the cup out of drainage low points and away from contour transitions so surface water sheds in more than one direction instead of pooling at your target.
Fitting the flagstick and testing the result
Match the flagstick and socket to the cup you installed. The pole should drop in cleanly, stand vertical, and lift out without binding or scraping. Attach the flag near the top, confirm the fabric hangs free, and swing the assembly gently to check for snags at every fitting.
Then test like an installer, not a hopeful golfer.
Straightedge check: Lay a straightedge across the cup rim and surrounding surface to confirm flush contact all the way around.
Four direction roll test: Roll several straight putts at the cup from at least four directions and watch for lip outs that repeat on one side.
Vertical check: Sight the flagstick from two angles and confirm it stands plumb without leaning in the socket.
Infill check: On artificial turf, brush migrated infill away from the cup edge so it doesn't build a tiny ramp.
Our breakdown of putting green construction and base preparation covers the surface work that has to happen before this hardware stage.
Know where accessory work ends. Swapping a flag on a sound cup is simple. Rebuilding a drainage envelope, correcting settled base, or regrading a surface that holds water is construction. Don't let a small hardware purchase talk you into ignoring a structural problem.
Maintaining Flags Through Northern Arizona Heat
Inspect on a schedule, not when something breaks. The failures that matter most are cup settlement, blocked drainage, and misaligned hardware. Flag color fading is cosmetic. A cup that dropped after a monsoon storm is a playing defect you'll feel on every putt.
Recheck the green after the first substantial irrigation or storm, then seasonally and after major precipitation. USGA drainage guidance identifies free flowing outfalls, unobstructed pipes, and periodic assessment as essential safeguards, and notes a drain camera can confirm blockages when flow is uncertain, as explained in USGA guidance on putting green drainage assessment. Correcting a shallow void or blocked outlet early beats cutting out settled turf later.
What should you inspect each season
Flagstick straightness: Roll the pole on a flat surface or sight down its length. Replace a bent pole instead of putting to a crooked target.
Socket and sleeve: Check for rotation, looseness, and grit that makes the pole bind.
Fabric condition: Look for fraying seams, torn attachment points, and fading that kills contrast.
Cup and surface: Run the straightedge test again, clear storm debris, and redistribute infill that migrated toward the cup.
Our full routine for putting green maintenance and seasonal care ties these hardware checks into turf brushing and surface care.
How hot is too hot to putt
Plan for heat as part of the system. Massachusetts public health guidance reports artificial turf can become substantially hotter than natural grass and advises monitoring surface temperature and limiting use when artificial turf exceeds 120°F, as stated in Massachusetts guidance on artificial turf field heat. Exposed metal cups and pole fittings can become burn hazards, and children will grab a flagstick without thinking.
No single infill or flag material eliminates heat risk. Shade, timing, and supervision do the real work.
Choose non abrasive, temperature conscious hardware where practical, keep shade and water near the green, and schedule practice for cooler hours. Check adjacent turf too, since kids run across it to reach the green. If the surface is too hot to touch comfortably, pause play. Your backyard putting green flags should mark a target your family can use safely, not lure anyone into midday heat.
Choosing DIY Installation or Professional Help
Be honest about scope. Replacing flag fabric or dropping a compatible flagstick into a sound, level cup is a reasonable DIY job. Almost everything underneath that cup is not.
When can you handle it yourself
DIY makes sense when all of these are true. Your cup rim is flush and stable. Your surface drains after storms with no standing water. Your sleeve doesn't rotate. You're comfortable checking level, vertical alignment, and safe clearances around play areas. If you're only upgrading fabric, color, or a worn pole on a green that already performs, do it yourself and save the service call.
Call a professional when the project involves a new cup location, artificial turf cutting and infill work, uneven grade, drainage correction, visible settlement, or a redesigned practice layout. The same goes for integrating a green into a larger Prescott design with pavers, walls, or outdoor living features. Those jobs fail underground first and show it at the cup later.
What drives the decision if not price alone
We won't quote invented numbers, because your site decides the scope. Weigh these variables instead.
Excavation and base work: New cups need stable support and restored surface around the cut.
Drainage scope: Correcting low pockets or blocked outfalls is the difference between a fix and a repeat problem.
Materials and design: Regulation style cups, replaceable flags, and custom layouts each change the hardware list.
Coordination and support: Site coordination, any permitting your project requires, and ongoing maintenance support all affect who should do the work.
R.E. and Sons Landscaping is licensed, bonded, and insured, serves Prescott, Prescott Valley, and Northern Arizona, and provides artificial turf, custom putting greens, yard installations, and ongoing maintenance support. Bring your checklist to a consultation. Intended use, players and ages, cup count, sun exposure, drainage history, and whether you want practice realism or decorative impact. We'll tell you plainly if your project is a simple flag upgrade.
The takeaway stays simple. The best flag is visible, compatible with your cup, stable in its socket, safe for your players, and supported by a surface that drains and stays level. Get those five things right and your green will practice as good as it looks.
If you're planning a new putting green or your current cup and flag setup leans, settles, or rejects good putts, talk with R.E. and Sons Landscaping about a design build consultation for your Prescott, Prescott Valley, or Northern Arizona home. We'll evaluate your surface, drainage, and flag hardware as one system and recommend the right fix, whether that's a simple flag replacement or a full custom putting green built to practice for years.
Comments